Introduction to QEMU 386
 Valery Brasseur
- 13 Min To Read
- 18 Feb, 2025
Here, we are going to talk a bit about QEMU.
In the world of virtualization, we often talk about either proprietary solutions (VMware or Hyper-V ) or open-source solutions such as like Xen or Proxmox and even a few others. Today, I want to talk to you a little about QEMU 386, which stands somewhat apart in this world.
QEMU is an open-source virtualization tool which holds a unique place. It is an open-source tool with a rather extensive codebase created by a Frenchman about thirty years ago. QEMU can fully emulate hardware for different architectures (x86, ARM, PowerPC, SPARC, etc.), allowing unmodified operating systems to run on different hardware architectures. For example, it allows old hardware, like a Sparc server, to run on a modern Intel server ! It is also used in the Apple world to run Windows x86 on ARM-based Apple M processors.
What also sets it apart is the fact that it has always operated via the command line, often very complex and lengthy, making it less approachable and less well-known. However, this is gradually changing, as some projects are starting to offer GUIs to make things easier. For instance, on Apple devices, there is the UTM project that provides a graphical interface. Additionally, tools are being developed to facilitate its use, as it is a key component of their major technological advancements. We also observe some open-source projects, like SPICE, which contribute to improving hardware simulation and virtualization by enhancing performance.
Another unique feature compared to many other virtualization platforms is that it also allows what is called “pass-through”. Also known as “device pass-through,” is a virtualization technique that allows a virtual machine (VM) to directly access a physical hardware device of the host, rather than going through intermediate emulation or virtualization layers. It is widely used, in GPU Pass-Through mode, for graphics-intensive applications like video games, 3D rendering, or machine learning computations.
It also has the unique feature, unlike many others, of being able to run on multiple platforms, mainly the three major ones: Windows, GNU/linux, and macOS, making it one of the most versatile. In this text, we will see a bit about how it works, what it allows, and some usage examples.
A brief reminder about virtualization
Let’s go through the different types of hypervisors and/or virtualization. There are generally two main categories:
Type 1 Hypervisors (Bare-Metal):
- They run directly on the host’s physical hardware.
- They generally offer superior performance and better resource management.
The most well-known are VMware ESXi Xen Project KVM (Kernel-based Virtual Machine) Microsoft Hyper-V
Type 2 Hypervisors (Hosted):
- They run on top of a host operating system.
- They are often easier to install and use for development environments or desktop setups.
In this category, we find VMware Player, VirtualBox.
QEMU can be used in several ways. The most common being System Emulation, where it provides a virtual model of an entire machine (CPU, memory and emulated devices) to run a guest OS. In this mode the CPU may be fully emulated, or it may work with a hypervisor such as KVM, Xen or Hypervisor. Framework to allow the guest to run directly on the host CPU.
QEMU in this mode can be used with both levels:
- Type 2 (Hosted Hypervisor): QEMU primarily functions as a type 2 hypervisor, as it usually runs on top of a host operating system, like GNU/Linux or Windows.
- Type 1 (Bare-Metal): When used in combination with KVM (Kernel-based Virtual Machine) on GNU/Linux, QEMU can function as a type 1 hypervisor. KVM allows QEMU to directly access hardware with hardware-assisted virtualization (Intel VT-x or AMD-V), offering performance close to bare-metal setups.
The second supported way to use QEMU is User Mode Emulation, where QEMU can launch processes compiled for one CPU on another CPU. In this mode the CPU is always emulated.
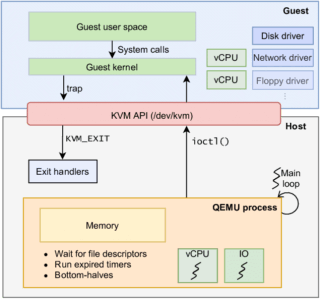
Most often, you will see QEMU under GNU/Linux with KVM as hypervisor, in this case QEMU will be the access entry point like in this diagram.
Usage
Let’s start with a simple case of a developer on a Windows PC who wants to use QEMU. Even though we often see examples under GNU/Linux, this mode is ultimately the most “visible” (and the similar case under GNU/Linux is often simpler).
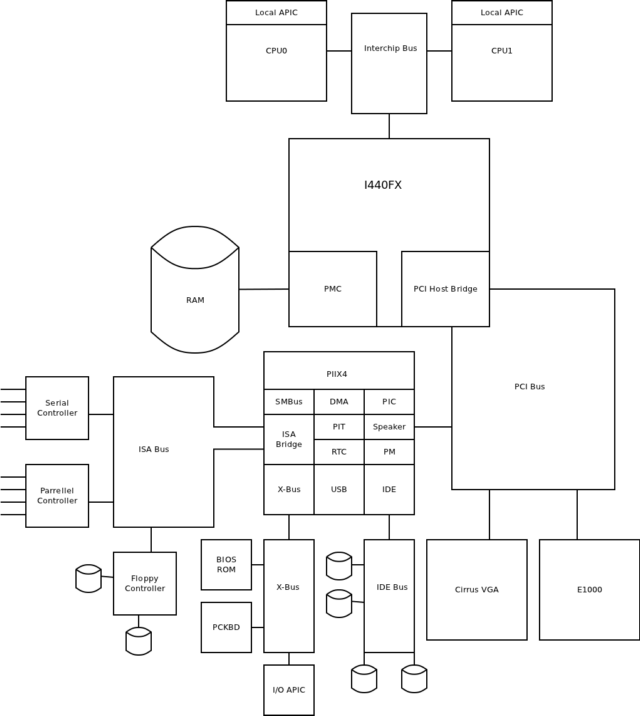
In our case, QEMU will present an emulation of a modern PC (named q35) which you can see like this:
We will quickly see that the origin of QEMU leads us to use the command line a lot if we want to be able to use all its flexibility and power. In the case of our Windows PC, and using Hyper-V acceleration, it looks like this. Here we will use an ISO (Rocky Linux) in live CD mode to install an OS on a virtual disk that we create if it does not exist. In our case, we will take the qcow2 format, which is QEMU’s native format.
We also see differences in how Bare-Metal is managed: GNU/Linux, via KVM, allows reflecting CPU information identically, while Hyper-V does not and requires the use of additional options to achieve the same result, such as kernel-irqchip=off which tells QEMU not to use the kernel irqchip that Hyper-V doesn’t pass through correctly.
Note also that, even though it’s a live image, we will create a disk image to be able to install it. Under QEMU, this can be done like this: qemu-img create -f qcow2 mydisk.img 10G
What is the qcow2 or Copy-On-Write format ? Copy-On-Write is a storage optimization strategy where changes to a file or disk are not written directly to the original file but are instead written to a separate location. This allows the original file to remain unchanged, and only the differences (or “writes”) are stored separately. This can save storage space and improve performance, especially in scenarios where multiple virtual machines share a common base image.
@echo on

set QEMU_BIN="C:\Program Files\qemu\qemu-system-x86_64.exe"
set QEMU_IMG="C:\Program Files\qemu\qemu-img.exe"
set LINUX_ISO="Rocky-8.10-XFCE-x86_64-20240529.0.iso"
set HDD_IMG="rocky_hdd.img"

rem Create an empty 10 GB HDD image if it does not exist
if not exist %HDD_IMG% (
    %QEMU_IMG% create -f qcow2 %HDD_IMG% 20G
)

rem Start QEMU with specified options
%QEMU_BIN% ^
    -accel whpx,kernel-irqchip=off ^
    -machine q35 ^
    -cpu qemu64 ^
    -m 2048 ^
    -smp 2 ^
    -drive file=%HDD_IMG%,format=qcow2,if=none,id=drive0 ^
    -device virtio-blk-pci,drive=drive0,bootindex=0 ^
    -drive file=%LINUX_ISO%,format=raw,media=cdrom,if=none,id=drive1 ^
    -device ide-cd,drive=drive1,bootindex=1 ^
    -spice port=5900,disable-ticketing=on ^
    -device virtio-serial-pci  ^
    -device virtserialport,chardev=spicechannel0,name=com.redhat.spice.0 ^
    -chardev spicevmc,id=spicechannel0,name=vdagent ^
    -display default,show-cursor=on ^
    -usb
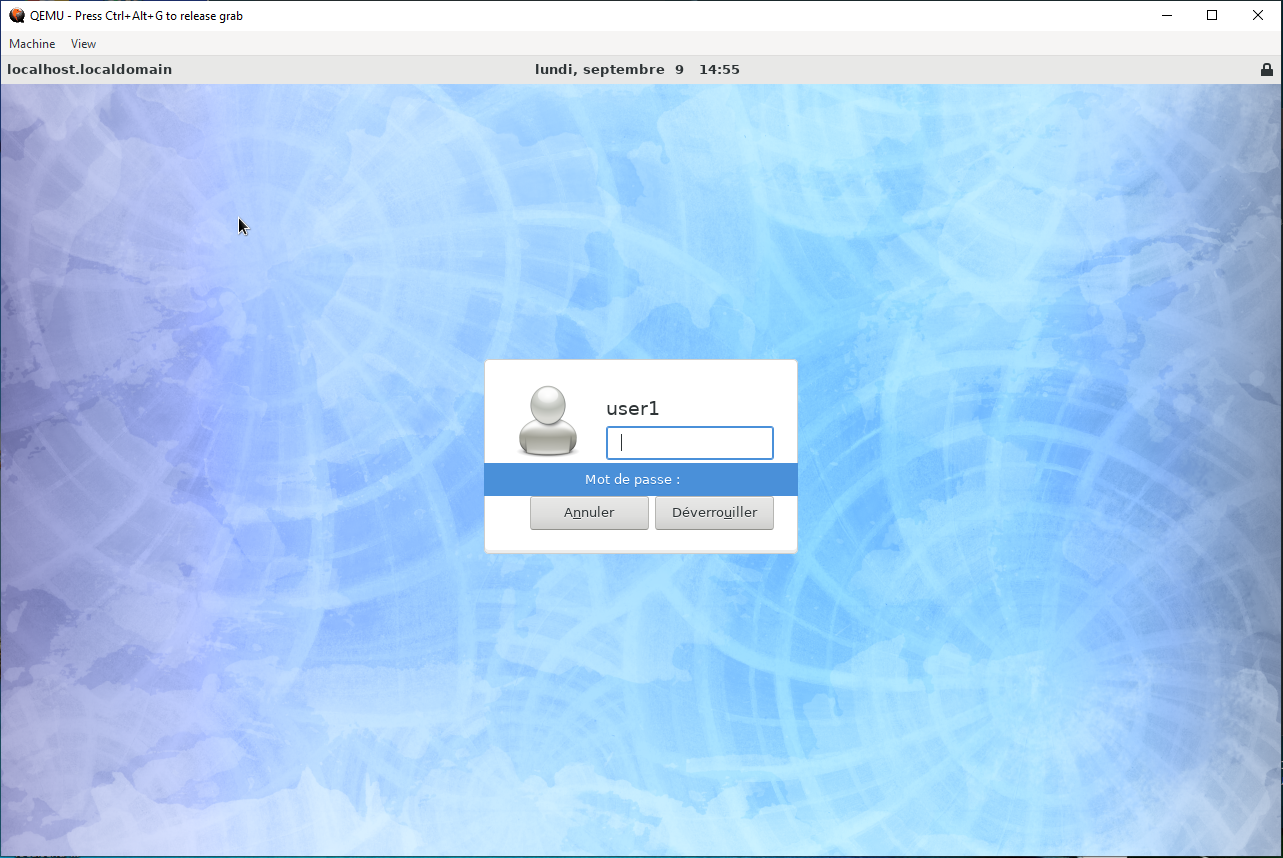
And here is the result:
if you have a GNU/linux desktop you can use the equivalent :
#!/bin/bash

QEMU_BIN="/usr/bin/qemu-system-x86_64"
QEMU_IMG="/usr/bin/qemu-img"
LINUX_ISO="Rocky-8.10-XFCE-x86_64-20240529.0.iso"
HDD_IMG="rocky_hdd.img"

# Create an empty 20 GB HDD image if it does not exist
if [ ! -f "$HDD_IMG" ]; then
  $QEMU_IMG create -f qcow2 $HDD_IMG 20G
fi

# Start QEMU with specified options
$QEMU_BIN \
  -enable-kvm \
  -cpu host \
  -m 2048 \
  -smp 2 \
  -drive file=$HDD_IMG,format=qcow2,if=none,id=drive0 \
  -device virtio-blk-pci,drive=drive0,bootindex=0 \
  -drive file=$LINUX_ISO,format=raw,media=cdrom,if=none,id=drive1 \
  -device ide-cd,drive=drive1,bootindex=1 \
  -spice port=5900,disable-ticketing=on \
  -device virtio-serial-pci \
  -device virtserialport,chardev=spicechannel0,name=com.redhat.spice.0 \
  -chardev spicevmc,id=spicechannel0,name=vdagent \
  -display default,show-cursor=on \
  -usb
But it should be noted that QEMU supports other formats, which allows importing existing images, for example, a VM originally from VMware:
@echo off

set QEMU_BIN="C:\Program Files\qemu\qemu-system-x86_64.exe"
set DISK_IMG_1="C:\perso\vm\ubuntu23\Ubuntu23 64-bit.vmdk"
set DISK_IMG_2="C:\perso\vm\ubuntu23\Ubuntu_home.vmdk"
set LINUX_ISO="C:\path\to\linux.iso"


rem Start QEMU with specified options
%QEMU_BIN% ^
    -machine q35 ^
    -accel whpx ^
    -m 8G ^
    -smp 2 ^
    -drive file=%DISK_IMG_1%,format=vmdk,if=none,id=drive0 ^
    -device virtio-blk-pci,drive=drive0,bootindex=0 ^
    -drive file=%DISK_IMG_2%,format=vmdk,if=none,id=drive1 ^
    -device virtio-blk-pci,drive=drive1,bootindex=1 ^
    -net nic ^
    -net user,hostfwd=tcp::2222-:22 ^
    -device virtio-net-pci ^
    -device qxl-vga  ^
    -spice port=5930,disable-ticketing=on ^
    -device virtio-serial-pci,id=virtio-serial0,max_ports=16,addr=0x6 ^
    -chardev spicevmc,name=vdagent,id=vdagent ^
    -device virtserialport,nr=1,bus=virtio-serial0.0,chardev=vdagent,name=com.redhat.spice.0
Note: We see that, although it is cross-platform, there are differences between operating systems due to differences in support/possibilities according to the said OS.
Some basic and useful parameters. Network management:
-net user,hostfwd=tcp::2222-:22: This option sets up user-mode networking, which is a simple way to provide network access to the virtual machine. The hostfwd=tcp::2222-:22 part sets up port forwarding, which allows connections to port 2222 on the host machine to be forwarded to port 22 on the guest machine. This is typically used for SSH connections. It uses the QEMU own TCP/IP stack, and we can think of this as connecting to an internal switch-net nic: This option creates a new Network Interface Card (NIC) for the virtual machine, more like plugin a real card.
In a simple usage you need both option : the last to have a card, the first to have it connected to the internal host network !
-device virtio-net-pciadd another type of network card
SPICE
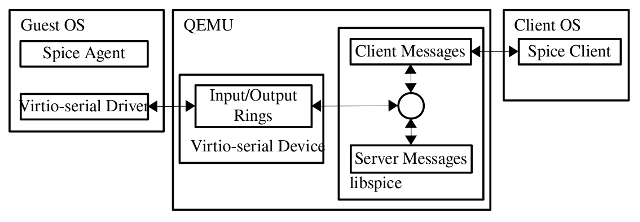
In the previous examples, we see that some devices are referenced as spice. But what is it? (No, it is not the well-known electronic modeling software!), here we talk of Simple Protocol for Independent Computing Environments. In QEMU, it will allow us to give a better user experience for audio/video, and also to show remote display
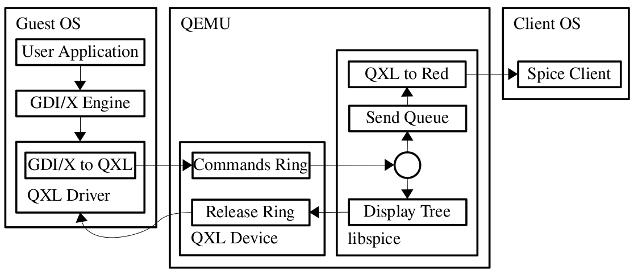
Here’s a simplified explanation of how it works:
Server Side: On the server side (the machine where the virtual machine is running), QEMU uses the SPICE protocol to capture the output of the virtual machine. This includes the video output, audio output, and other information like clipboard content.
Client Side: On the client side (the machine that is used to access the virtual machine), a SPICE client is used to connect to the SPICE server. The client receives the video, audio, and other information from the server and presents it to the user. The client also captures user input (like keyboard and mouse events) and sends it back to the server.
Communication: The communication between the SPICE client and server is done over a network connection. The SPICE protocol is designed to be efficient even over slow network connections. It achieves this by using techniques like video compression and by only sending updates when something changes on the screen.
You could also have a Spice agent, which is a software module executed in the guest. Spice server and client use the agent for tasks that need to be performed in the guest context, such as configuring the guest display settings.
SPICE is a great way to run QEMU in headless mode when you need to attach from a remote location. It will also allow you to have copy/paste sharing support, USB pass through or file sharing more easily
Emulation mode
The second interesting mode is its emulation mode, here we will only scratch the surface and show what you can do with a simple example :
qemu-system-arm -M versatilepb -m 128M -kernel <path_to_your_kernel_image>
- qemu-system-arm: This is the QEMU system emulator for ARM. Notice the difference with the simulation mode.
- -M versatilepb : This option specifies the machine type. In this case, it’s
versatilepbwhich stands for Versatile Platform Board, a type of ARM system. Somewhat like, for simulation we use the PC q35 board, here we use an ARM board. - -kernel <path_to_your_kernel_image>: This option specifies the path to the kernel image that you want to boot.
QEMU is also able to emulate the following hardware
- PC (x86 or x86_64 processor)
- ISA PC (old style PC without PCI bus)
- PREP (PowerPC processor)
- Sun4m/Sun4c/Sun4d (32-bit SPARC processor)
- Sun4u/Sun4v (64-bit SPARC processor, in progress)
- ARM Integrator/CP (ARM)
It also supports the following processors : x86 (32 and 64 bit), PowerPC (32 and 64 bit), ARM, MIPS (32 bit only), SPARC (32 and 64 bit), Alpha, ColdFire(m68k), CRISv32 and MicroBlaze CPUs.
Pass-through usage
Note: The effectiveness of this usage is highly dependent on your hardware, so this will be a general preview of how it works.
Pass-through in QEMU refers to the process of allowing a virtual machine direct access to specific hardware on the system. In the context of a GPU, this means that the virtual machine will have direct access to the GPU, bypassing the host operating system. This can significantly improve performance for applications that benefit from GPU acceleration, but also create some security breach.
If you have a desktop computer with a spare GPU that you can dedicate to the host (whether it’s an integrated GPU or an old OEM card, the brands do not need to match) and your hardware supports it, it is possible to have a virtual machine of any OS with its own dedicated GPU and near-native performance.
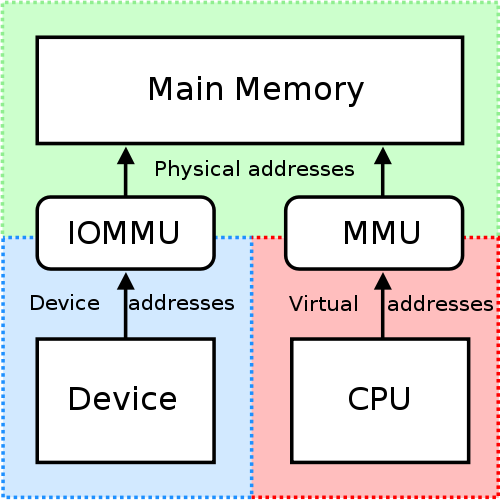
To use GPU pass-through in QEMU on an x86 system, your system must support IOMMU (Input-Output Memory Management Unit). IOMMU, or Input-Output Memory Management Unit, is a type of memory management unit (MMU) that connects a Direct Memory Access (DMA)-capable I/O bus to the main memory. Like a traditional MMU, which translates CPU-visible virtual addresses to physical addresses, the IOMMU maps device-visible virtual addresses (also called device addresses or I/O addresses in this context) to physical addresses. In the context of virtualization, IOMMU is used for hardware devices to directly access memory while the device is assigned to a specific virtual machine.
Here are the steps:
- Enable IOMMU in your system BIOS: This is usually found under advanced settings. The name can vary depending on the motherboard manufacturer. It could be VT-d (for Intel) or AMD-Vi (for AMD).
- Using IOMMU: This opens up features like PCI pass-through and memory protection from faulty or malicious devices. An IOMMU provides memory protection by mediating access to physical memory from devices such as network cards, GPUs, etc.
# dmesg | grep -i -e DMAR -e IOMMU

[    0.000000] ACPI: DMAR 0x00000000BDCB1CB0 0000B8 (v01 INTEL  BDW      00000001 INTL 00000001)
[    0.000000] Intel-IOMMU: enabled
[    0.028879] dmar: IOMMU 0: reg_base_addr fed90000 ver 1:0 cap c0000020660462 ecap f0101a
[    0.028883] dmar: IOMMU 1: reg_base_addr fed91000 ver 1:0 cap d2008c20660462 ecap f010da
[    0.028950] IOAPIC id 8 under DRHD base  0xfed91000 IOMMU 1
[    0.536212] DMAR: No ATSR found
[    0.536229] IOMMU 0 0xfed90000: using Queued invalidation
[    0.536230] IOMMU 1 0xfed91000: using Queued invalidation
[    0.536231] IOMMU: Setting RMRR:
[    0.536241] IOMMU: Setting identity map for device 0000:00:02.0 [0xbf000000 - 0xcf1fffff]
[    0.537490] IOMMU: Setting identity map for device 0000:00:14.0 [0xbdea8000 - 0xbdeb6fff]
[    0.537512] IOMMU: Setting identity map for device 0000:00:1a.0 [0xbdea8000 - 0xbdeb6fff]
[    0.537530] IOMMU: Setting identity map for device 0000:00:1d.0 [0xbdea8000 - 0xbdeb6fff]
[    0.537543] IOMMU: Prepare 0-16MiB unity mapping for LPC
[    0.537549] IOMMU: Setting identity map for device 0000:00:1f.0 [0x0 - 0xffffff]
[    2.182790] [drm] DMAR active, disabling use of stolen memory
To assign a device to a virtual machine, the device and all those sharing the same IOMMU group must have their driver replaced by a stub driver or a VFIO driver to prevent the host machine from interacting with them. Due to the complexity of GPUs, it is generally advised to bind these placeholder drivers manually before starting the virtual machine to stop other drivers from attempting to claim them.
- Identify the PCI address of your GPU: You can do this by running the following command in your terminal:
lspci -nn | grep -i vga

00:02.0 VGA compatible controller [0300]: Intel Corporation 3rd Gen Core processor Graphics Controller [8086:0166] (rev 09)
- Unbind the GPU from the host OS: You can do this by running the following commands in your terminal. Replace “0000:00:02.0” with the PCI address of your GPU.
echo "0000:00:02.0" > /sys/bus/pci/devices/0000:00:02.0/driver/unbind
echo "0000:00:02.0" > /sys/bus/pci/drivers/vfio-pci/bind
- Add the following lines to your QEMU command: Replace “00:02.0” with the PCI address of your GPU.
-device vfio-pci,host=00:02.0,x-vga=on
In this configuration, some tuning might be necessary, such as CPU pinning and CPU topology (multicore, SMT, etc.) to lessen the effect of cache thrashing and GPU/CPU communication.
Note: In some cases, you may also want to pass through some drives, which is possible with the use of virtio-scsi. The same applies to network cards, which is useful for high-bandwidth network cards (like gigabit and up) with the use of virtio-net.
All these pass-through configurations can be tuned to give high performance to the virtual machine, but at the cost of complexity and high dependency on hardware configuration. Therefore, it should be done on a case-by-case basis.
Conclusion
QEMU is a versatile and powerful tool for virtualization, offering unique features like hardware emulation, device pass-through, and cross-platform compatibility. It is suitable for various use cases, from simple desktop virtualization to complex hardware emulation and high-performance computing.
Some links for reference: