Making an interactive and playful open source training material
 Sylvain Pollet-Villard
- 12 Min To Read
- 17 Sep, 2024
How gamification turned a boring training session into a fun and engaging experience
Context
Teaching and helping others is one of the aspects I like the most about my job. When I was suggested to become an internal trainer at Worldline for web development trainings, I was super enthusiastic. But I also had a fear, that of being one of the numerous boring teachers with poorly made training material that I had to endure during my studies.
I’m now doing this for over 6 years now, and enjoy it a lot. All the training materials I make are open source and published on Worldline Github organization , so that anyone can use them and contribute to them.
These training sessions usually are about 2 to 3 days long. Some sessions are on site, some are remote through video conference. Some people also requested to be able to follow the training by themselves, at their own pace. That’s why an online website to host the training material ended up being the best solution to reach all these different needs.
While working on a new training about modern HTML/CSS targeted to mostly back-end developers, I decided to innovate on the training material based on what I learned from the 4 other training sessions I worked on before.
I already knew some good practices: set clear objectives, mix regularly between theory and practice, define checkpoints for students to catch up if needed, and advanced exercises for the students who finish early. But yet I had some concerns about this new training, especially about the fact that it had lots of theory to cover with all these CSS properties to know, and most of the concepts require visual aids to be properly understood. Not only images, but actual interactive examples were key to understand how a specific layout in CSS would behave.
So it became clear to me that this training material will need to be very different, more interactive, and playful. I want to make sure that the students will have fun while learning, and that they will be able to experiment with the concepts they learn directly in the training material. I could not picture any other way to teach the hundreds of different CSS properties out there, otherwise students are doomed to be bored by the amount of theory to learn.
Making interactive exercises
What I mean by interactive exercise is a fast feedback loop, a.k.a. trial and error. The student should be able to try something, see the result, and understand why it behaves this way. The speed of this feedback loop is key to encourage the students to experiment.
This involves two parts, the input where the students put their answer, and the output which shows the result of that input. The input can take several forms. For this training, I use these types of inputs of my exercises:
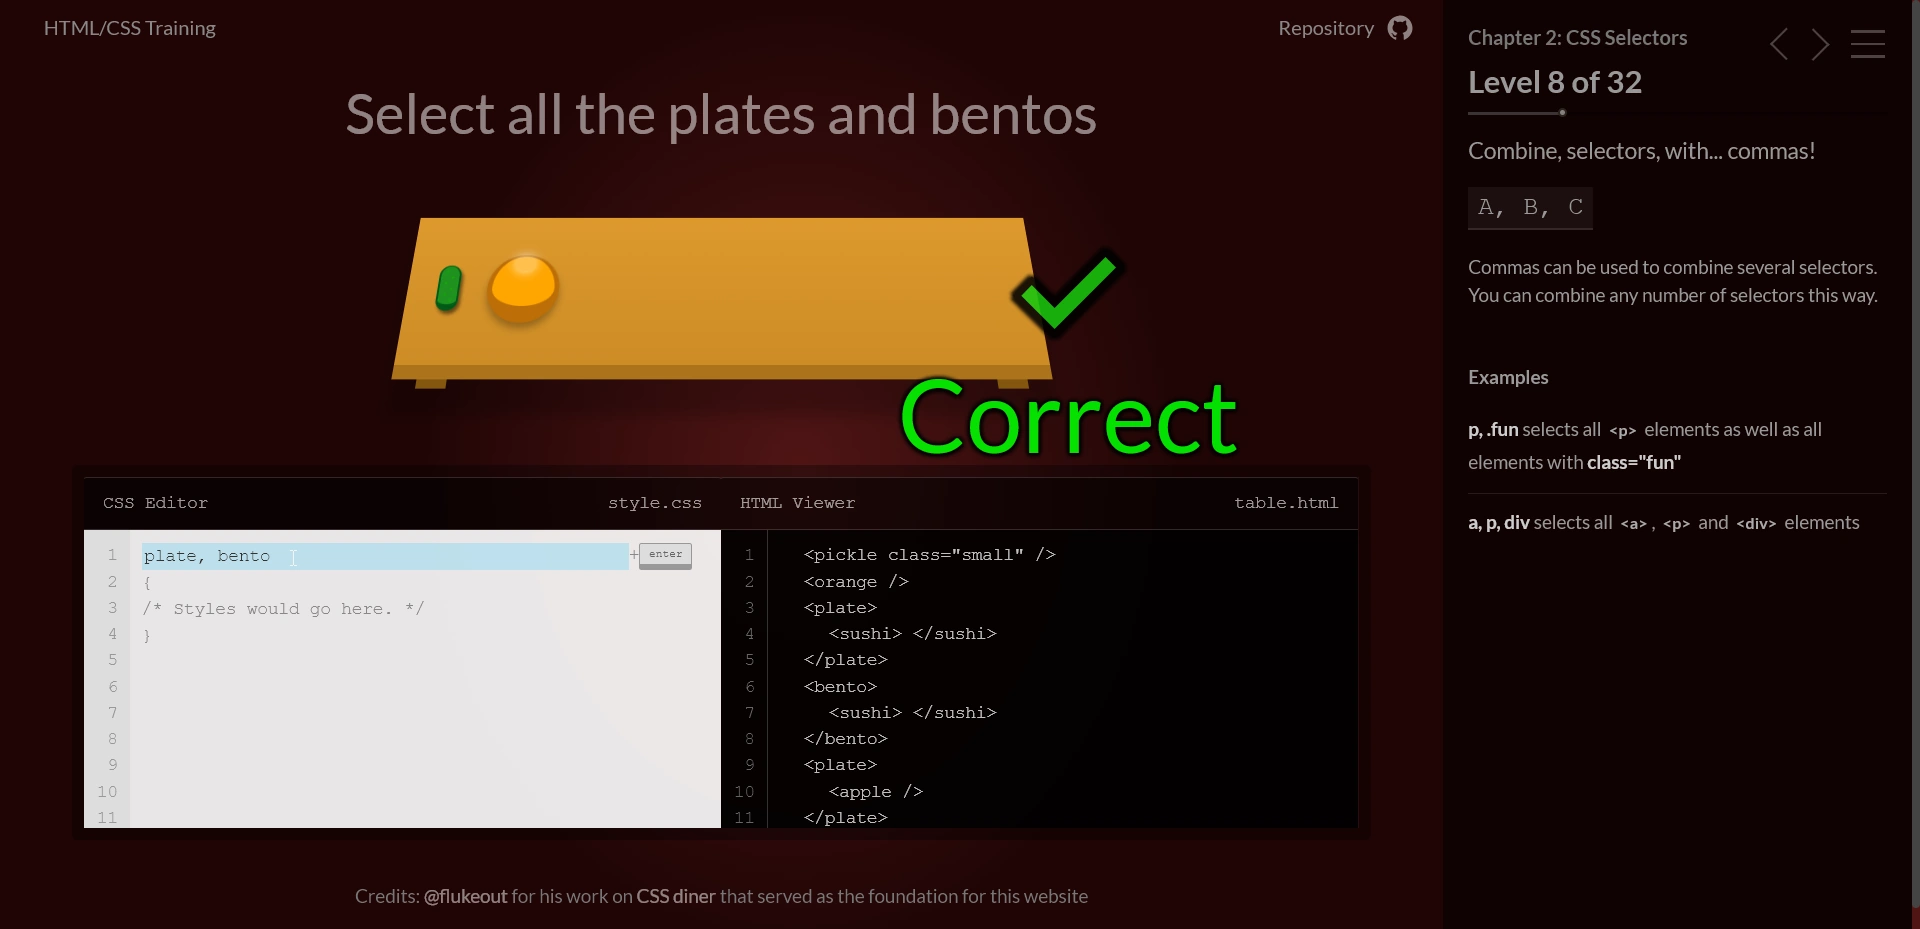
- Text input: the student writes a CSS selector, a CSS property, or a value
- Multiple choice: the student picks the right answer among several propositions by clicking on an element to switch between the propositions
- Click to select: the student must click on the right element. They can rotate the camera in 3D by moving their mouse cursor
- Code editor: the student writes HTML/CSS code in a code editor, and the result is displayed in real time using a development server with hot reload (Vite )
The output is usually a panel or a console displaying the result. For my context of a CSS training, it was quite easy: since the training material is a website, I can directly apply the exercise code inside the training material. Because no compilation/simulation needs to be performed, the feedback loop is almost instant and students can use additional tools like their browser’s devtools to understand why their answer is wrong. It’s not that easy for other topics, like algorithms or databases, but that should not discourage you to try getting this kind of interactivity in your training material.
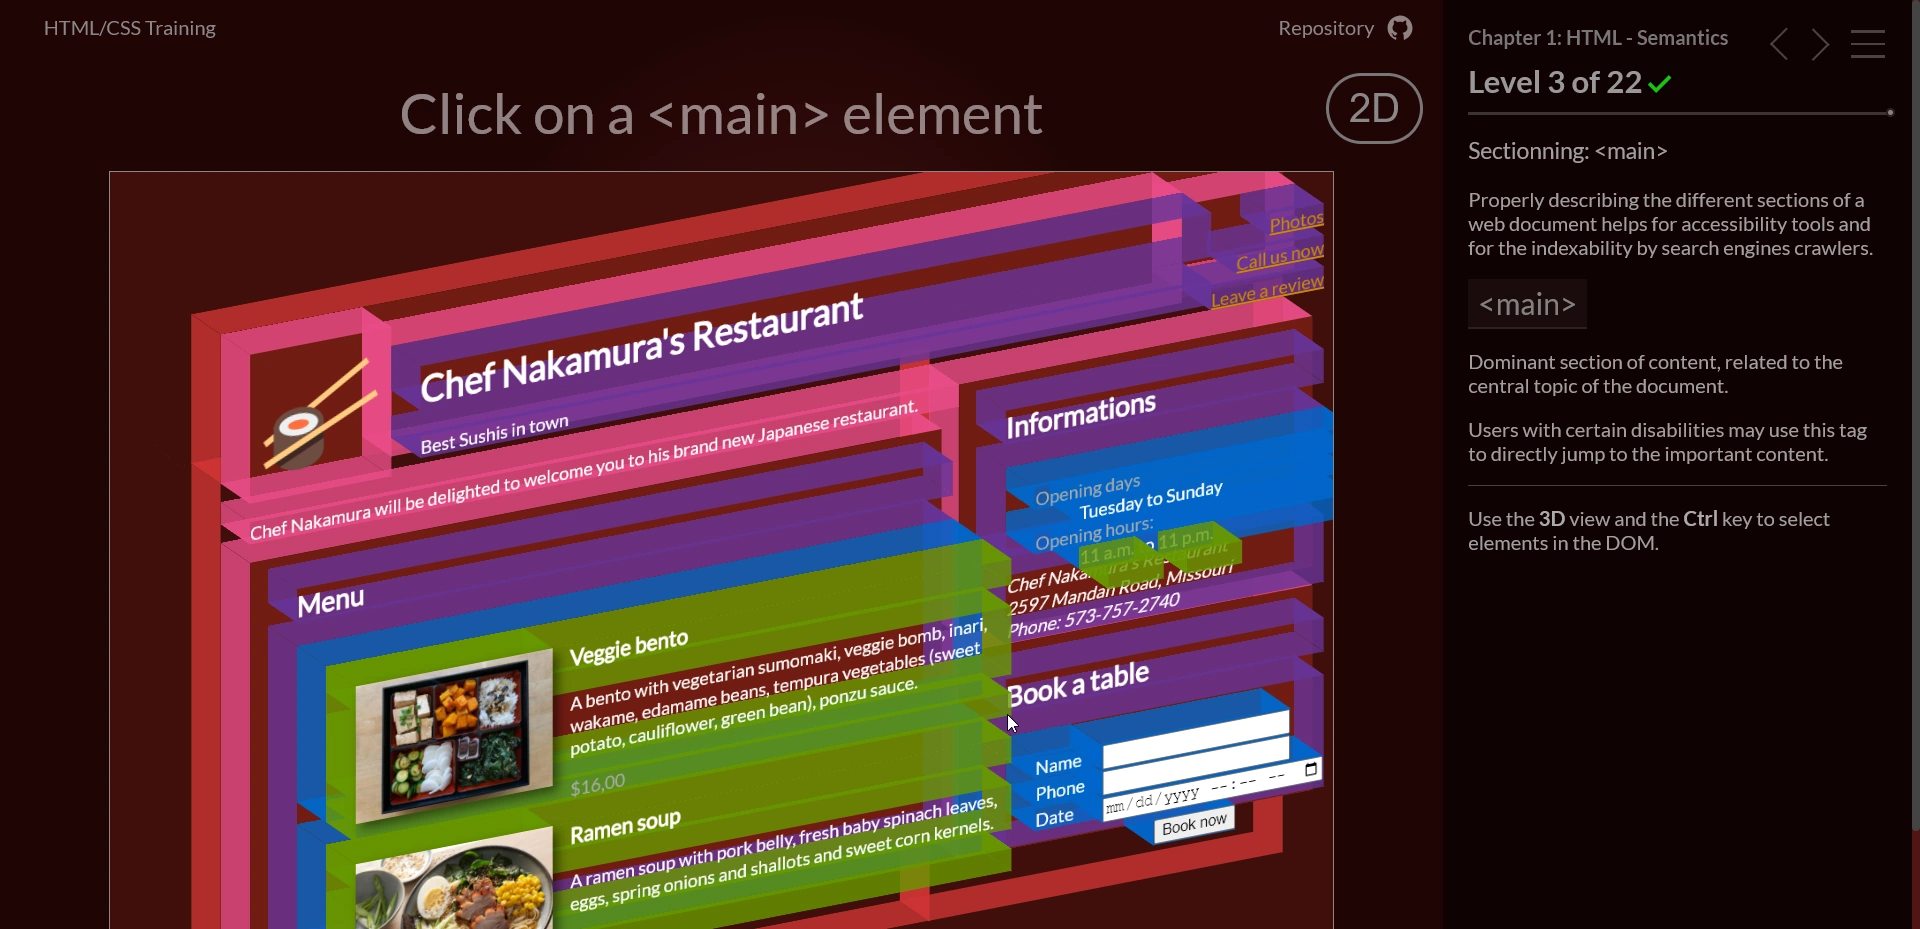
I also took the opportunity of having complete freedom on the output to play around CSS features and give them a purpose for the exercices. For example, the first chapter is about identifying HTML elements for their semantic use, and I used CSS 3D transforms to allow students to look around the website from different angles in a 3D view. This gives a better understanding on the nesting of the elements, and allow to precisely select an element in a DOM tree. Not only this makes the exercise more visually intuitive, but it’s also a way to demonstrate the powerful capabilities of CSS. Since the training material is open source, the most curious students will look at the source code to try to understand how it was done.
Once I knew what would be the global structure of the training, I decided to organize the layout of the training material this way:
- A toggleable sidebar menu with all the chapters to quickly navigate. Each chapter will be composed of several exercises, called levels.
- A level instructions area with theory and examples, and the progress bar for the chapter
- The output area with a main instruction that sum up the level
- The input area below in the form of a code editor split into two panels, CSS and HTML

Having everything in the same place helps students to focus and avoid losing time switching between tabs or windows. In addition, for on-site training sessions, as a trainer I showed on the video projector some cheat cheets or additional information to help the students for a specific chapter.
Rewarding and gamification
Video games industry has perfected for several decades the art of making the player feel rewarded and engaged. There is a reason why gamification is so trendy in the e-learning industry: it works . There are various mechanisms that can be used to make the student feel rewarded. The immediate visual and auditive feedbacks are the most common ones. Think about power-ups sound effects, firework animations, thumbs up emojis. They provide small dopamine hits as long as they are not too repetitive and they are actually the result of the student’s actions and effort.
The way i added these visual feedbacks in the training material is very simple but effective: when the student validates an exercise, the text: “✅ Correct !” appears with a small animation, the elements selected fly out of the screen and a sound effect is triggered. If the answer is wrong, the screen shakes with another negative sound effect. Being wrong is not pleasant, and you may want to provide some hints to the student directly after a wrong answer. Finding the right hint is quite delicate: you don’t want to give the solution directly, otherwise the objective of the exercise is lost. But you don’t want to let the student stuck either, or leading him to spam random answers until being right. The hint should be a small nudge in the right direction, and the student should be able to try again immediately after reading the hint.
It’s not easily doable on all exercises, but the way I did it on chapter 2 (CSS selectors) is shaking up the items that have been selected incorrectly with the wrong selector provided by the student, then animating the right items to select with a small wobble effect. This way, the student can see how his selector was wrong, and maybe clarify the instructions by showing the elements they are supposed to select.
Another important aspect of gamification is the sense of progress. I added a small progress bar for each chapter counting the number of levels passed. This progress bar is updated in real time, and the student can see how far they are from the end of the chapter. When all the levels of a chapter are passed, the entire level menu is filled with ✅ which is very satisfying visually. It’s known for a fact that many players are urged by the need of completeness. It’s also helpful for the trainer to quickly see how the students are progressing, and to know if they are stuck on a specific level.
Finally, for your training material to be perceived as fun, it must look nice. Not necessarily top-notch graphics, but wholesome, colorful objects with a consistent theme. I decided to go with a Japanese sushi restaurant theme, and made the table, plates, sushis, fruits and other dishes in pure CSS without using images. This allows curious students to inspect the code and see how it was done, and it’s also a good way to show the power of CSS for drawing shapes and animations.
There are others aspects of gamification that I didn’t use in this training, like leaderboards, badges, scoring, achievements… I think the competitive aspect of those features can backfire pretty quickly in a training context, especially when the students are not at the same starting level. But I’m sure they can be used properly in other contexts.
Managing pace and checkpoints
Segmenting the training content into several chapters is crucial: it gives a clear structure to the training, allows the students to see their progress, allows the trainer to better manage its time; it’s helpful for everyone. Each chapter should have a clear objective, with exercices aiming to ensure that this objective is reached. Validating an exercise should feel like a checkpoint for the student, a way to ensure that they understood the concept and are ready to move on to the next chapter.
The pace of each chapter must depend on two things: the objective of the chapter, and its place in the context of the entire training.
- The objective of the chapter
Acquiring a skill goes through different steps: discovering the concept, understanding the concept, applying the concept, and mastering the concept. Depending on the objective, the pace of the chapter and the type of exercise should be adapted:
- To discover the concept, a theoretical explanation with examples is the best. Use all the media at your disposal: text, images, videos, interactive examples, etc.; manage the attention span carefully, and make sure that the students are not overwhelmed by the amount of information
- To understand the concept, fast-paced exercises with oriented open-ended questions and immediate feedback are the best
- To apply the concept, I suggest medium length exercises (~20 minutes), with less guidance and more goal oriented, that repeats a process 3 to 4 times with small variations
- Finally, to master the concept, only time and practice will help. Long practical work covering various use cases and edge cases should help going through this step
- Its place in the context of the entire training
Typically, you wouldn’t chain two large practical works one after the other, as it would be too exhausting for the students. Moreover, the skill gap between students can be very large, and some students might finish the exercises very quickly, while others might struggle to finish them in time. This time gap would increase progressively and can be very frustrating for the students who finish early, and very discouraging for the students who struggle to finish in time.
On the contrary, chaining too many fast-paced exercises can feel repetitive and exhausting for students too. The attention span and the size of the working memory of a human being are limited, and it’s important to take that into account when designing the training material. That’s why taking regular breaks and varying the pace of the exercises is very important.
For this training, I decided to alternate between fast-paced interactive exercises and quick bits of theory; with two interludes about “good to know” chapters without exercises (Interactions & CSS animations), and with a final practical work at the end of the training to apply all the concepts learned.
Working around a common thread / story line
Practical examples are very helpful to understand theoritical concepts. When a student pictures a real case scenario where the concept is applied, it helps a lot for memorization and understanding. So I decided to create a common thread in the training material, a story line that would be followed by the students throughout the training. This story line would be about a fictional Japanese sushi restaurant.
Every chapter of the training would be related to this common thread:
- Chapter 1 HTML Elements: identify the role and semantics of HTML elements by looking at the restaurant website
- Chapter 2 CSS Selectors: pick the right dish on the restaurant table using the right CSS selector
- Chapter 3 CSS Specificity: based on customer requests which are more or less specific, put the right dish on each plate
- Chapter 4 Inline & Block layout: correctly set the dinner table with the right layout
- Chapter 5 Flex: put the sushis on the plates
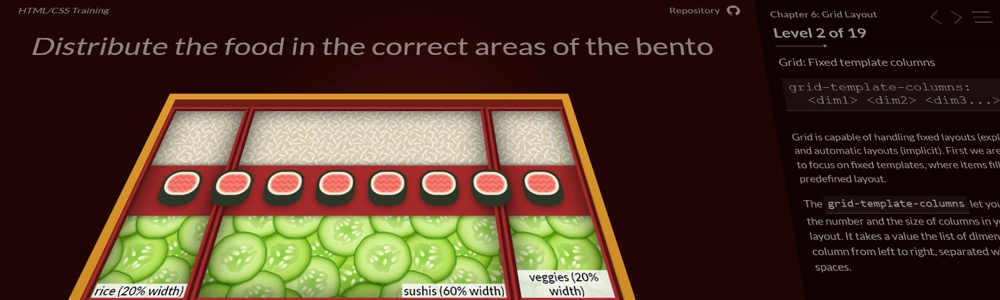
- Chapter 6 Grid : put the appropriate dishes in the different areas of the bento
- Chapter 7 Typography: beautify the restaurant menu
- Chapter 8 Background & Images: add pictures and decorations to the restaurant menu
- Final practical work: make the entire restaurant menu in HTML from scratch based on a mockup
Based on the feedbacks I received, students are amused by this kind of story line. It makes the training less boring and more rememberable.
Open Source and licensing
I decided to go with Mozilla Public License 2.0 for the licensing of my open source training content. It is a popular and straight-forward copyleft license for open source projects, recognized by Free Software Foundation and Open Source Initiative. If your training contains both code and written material, you can use dual licensing, such as a mix between creative commons and MIT/BSD/whatever.
Getting contributions and pull requests from the community feels good; it’s nice to realize that your work has been used out there. But it also implies to take the time to review feedbacks, issues and suggestions. If your repository starts to get some attention, I recommend writing a contribution guide in a contributing.md file at the root of your repository, and to link it in the README.
Final words
There’s always room for creativity and training materials are no exception. I hope this article will inspire you to make your training material more playful. I’m convinced that the more fun the students have, the more they will learn. It’s also very important to have fun as a trainer too, especially if you have to repeat the same training several times.
Be creative ! I’m looking forward to see what you will come up with.