
Testcontainers - Automated Network Testing
 Michael Zinsmaier
- 8 Min To Read
- 30 Aug, 2023
Introduction
Today let’s talk about reproducible, self contained and most importantly automatable network tests for Java network applications powered by Testcontainers . If you read some of my older articles on Zero Trust Network Architecture (1 , 2 & 3 ) you can easily guess that at Worldline MTS we have some practical applications for that.
As an example lets assume we have a simple TCP/IP proxy, that forwards all traffic on its listening port to a target server. This can be easily written on top of Netty . Our job is to battletest this application against the nasty reality of networking.

This article covers the basic setup, a few pitfalls and a thorough explanation on how to combine Testcontainers, toxiproxy and JUnit.
Motivation
Why would you want to use containers in the first place? Excellent question! Firstly, the container approach gives us full flexibility to create the network traffic Source and Sink from scripts, code snippets or real world applications. Secondly, we still manage to integrate neatly with JUnit thanks to the power of Testcontainers. Finally, containers foster reusability across tests and projects, work (mostly) reliably across operating systems and have low demand on infrastructure.
A drawback of the presented setup is that the network stack is only simulated and worse not fully isolated. We run our Proxy Under Test on the docker host and network buffers, timeouts and generally network settings of the host remain relevant. In practice, this means you might still get different results, if tests are executed on Linux vs. Windows or a tuned vs. default machine.
But all things considered, containerized network tests strike a nice balance between effort and value and are only outperformed by a full integration environment which comes at way higher cost.
Setup (for Windows)
If you are like me - your development machine is a Windows Laptop, but things will eventually run on Linux build and production servers. For Docker + Linux there are no secrets to share, everything should run smoothly. The same can be achieved with the Windows Subsystem for Linux (WSL). I currently use Rancher Desktop as a out of the box solution and the following steps will prepare your machine:
- install WSL
- install Rancher Desktop & configure dockerd (moby)
- integrate with IntelliJ (Docker Plugin & “Docker for Windows” option)
- configure other tools with the npipe (npipe:////./pipe/docker_engine)
Unfortunately, from time to time things just stop working. Digging through some Google results the culprit is either Windows , Testcontainers or Docker .

In any case something goes wrong and we end up in an invalid state:
WARN o.t.utility.RyukResourceReaper -- Can not connect to Ryuk at localhost:49153
Ryuk is part of Testcontainers and responsible for the cleanup of resources (read Ryuk the Resource Reaper from my colleague Peter Steiner to learn more).
As soon as Ryuk gets stuck things won’t cleanup. While disabling ryuk works, we will run into name conflicts and trash our system. This issue is resolvable but not deterministically. I usually execute workarounds in this order:
restart Rancher Desktop > restart my laptop > docker system prune > re-install Rancher Desktop. Luckily the laptop restart usually does the trick and it doesn’t happen that often.
Baseline Implementation
To get started we need some kind of network application, the Proxy Under Test. We also need to decide how we want to create the traffic Source and Sink. For full, but NOT production ready examples and tests there is a small project on the Worldline - GitHub . In the article I will include some snippets.
A basic traffic Source that streams a random file of size X from /opt/streaming/random/ to the client, which will store it to /opt/receiving/random/ can be created with a few lines of scripting:
echo ">> streaming server started, will generate a random file of $1 MB and stream it"
mkdir /opt/streaming
dd if=/dev/urandom of=/opt/streaming/random bs=1M count=$1

echo ">> done generating, ready to stream data on port 8000 to the first client"
echo "[TestContainers] ready for testing"
cat /opt/streaming/random | nc -l -p 8000

echo ">> did stream one file, stopping"
As you see the containers make this quite easy:
Now, we are finally ready to get our hands dirty and start working with Testcontainers.
Testcontainers & Network Testing
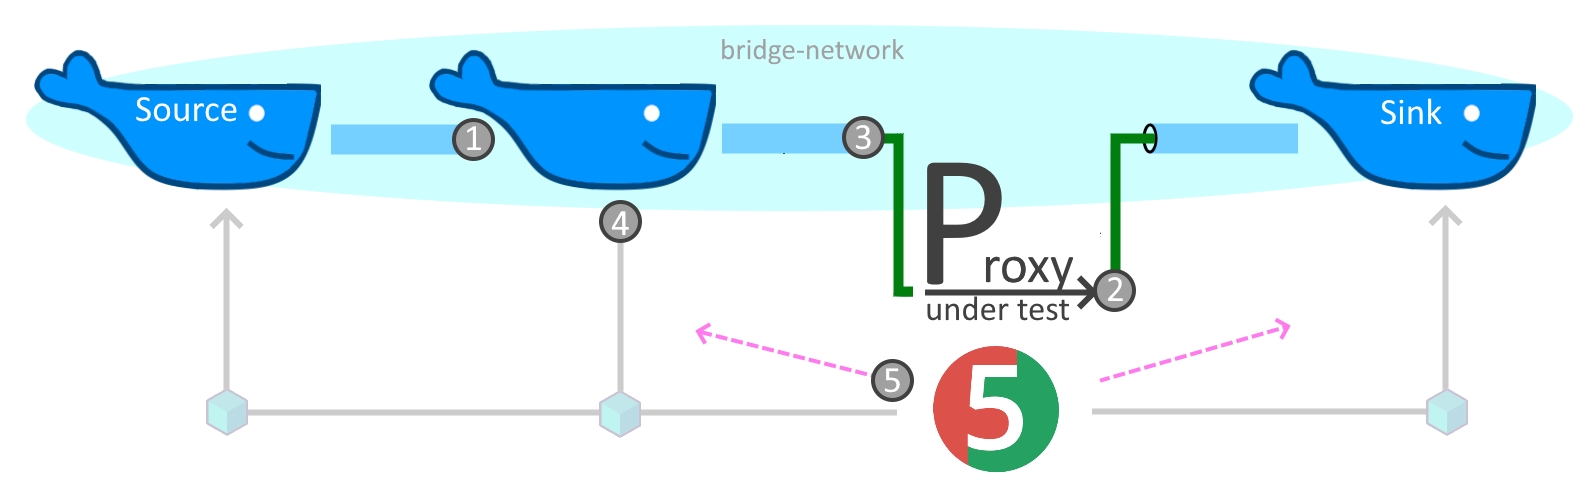
For the basics of Testcontainers I’ll refer to their excellent docu . We will instead deep dive into the networking aspects! As you probably know Docker comes with different networking options, for us a user defined bridge network is a good choice as it will provide us isolation and DNS resolution. This ensures that tests don’t interfere with each other and the different building blocks can be wired together with a stable and easy to use approach - communication by DNS name (1).
Additionally we want to funnel traffic via our Proxy Under Test on the host (2).
We could use the special DNS entry host.docker.internal (also available for Linux since Docker 20.10
) but in my experience this is still a bit flunky.
On my development machine I have to enable the experimental Rancher network tunnel feature (v1.9.1) to get traffic from WSL to Windows and generally it might not be wise to give all containers direct access to your host.
But Testcontainers has us covered. There is a cross platform utility (3), which allows to limit exposure, provides port mappings and fosters better isolation for more stable tests! The final pieces are usage of toxiproxy (4) and an outlook beyond Testcontainers (5) but lets go step by step:
(1) Network Alias for DNS
The preferred way to set a DNS name with Testcontainers is a network alias. But we can also use the low level API to modify the container name for the same effect.
var containr = new GenericContainer<>(createImage(resourceRelativePath))
					.withNetworkAliases(containerName);

// OR .withCreateContainerCmdModifier(cmd -> cmd.withName(containerName))
The advantage of the network alias is that it will not break isolation, parallel tests can be executed on their respective anonymous networks with anonymous containers. The container name on the other hand comes in handy during test development to easily identify containers on your machine.
(2) Expose Ports
To funnel traffic into an exposed port we have to register the port (container view) with the framework, start the container and then retrieve the randomly chosen port on the host.
var simpleServer = new GenericContainer<>(...

// prepare & start
simpleServer.withExposedPorts(8000);
simpleServer.start();

// retrieve the randomly assigend host port
int hostPort = simpleServer.getMappedPort(8000);
Order matters, you can’t access the mapped port before starting the container.
(3) SSHD and Host Ports
To connect to a port on the host you can use the special host.testcontainers.interal DNS name.
Internally this is resolved to the IP of a sshd container that creates a tunnel to the host.
// powershell:
// docker run --rm -p4080:80 nginxdemos/hello

var wgetClient = new GenericContainer<>(DockerImageName.parse("busybox:latest"));
wgetClient.withCommand("sh", "-c", "while true; do sleep 1; done");

// expose a host port via sshd tunnel
int tunneledPort = 80;
int hostPort = 4080;
org.testcontainers.Testcontainers.exposeHostPorts(Map.of(hostPort, tunneledPort));

// after configuration
wgetClient.start();

// use it
wgetClient.execInContainer("wget", "http://host.testcontainers.internal:" + tunneledPort);
This is again order dependent, you need to call the framework before you start the container.
(4) Test with toxiproxy
Testcontainers provides a ready to use module for toxiproxy.
Simply create the container, connect a control client to toxiproxy.getControlPort() and define a new proxy on one of the 32 exposed ports [8666, 8697].
Control and proxy ports are mapped at random to the host to avoid conflicts.
var network = Network.newNetwork();
var toxiproxy = new ToxiproxyContainer("ghcr.io/shopify/toxiproxy:2.5.0");

toxiproxy
   .withNetwork(network)
   .withNetworkAliases("toxiproxy")
   .start();

// create the control connection
var toxiproxyClient = new ToxiproxyClient(toxiproxy.getHost(), toxiproxy.getControlPort());

// configure the proxy and set toxics
var proxy = toxiproxyClient.createProxy("lowBandwidth", "0.0.0.0:8666", "target:8000");
var kbPerSec = 1000;

proxy.toxics().bandwidth("slowDownstream", ToxicDirection.DOWNSTREAM, kbPerSec);
proxy.toxics().bandwidth("slowUpstream", ToxicDirection.UPSTREAM, kbPerSec);
In this example we also create and share a network for container to container communication.
(5) Docker-Java
Sometimes you need to go beyond the abilities of Testcontainers.
To customize a container before its creation you can access the underlying docker-java
framework with container.withCreateContainerCmdModifier(....
During container lifetime there is container.execInContainer(... the equivalent of docker exec, which allows to build workarounds like zipping up files before copying them.
Finally if you need absolute control you can work directly with Docker:
// npip = Windows, for Linux use unix:///var/run/docker.sock or tcp
var CONNECT = "npipe:////./pipe/docker_engine";

var config = DefaultDockerClientConfig.createDefaultConfigBuilder().withDockerHost(CONNECT).build();
var httpClient = newApacheDockerHttpClient.Builder()
  .dockerHost(config.getDockerHost())
  .sslConfig(config.getSSLConfig())
  .build();

// obtain a dockerClient
var dockerClient = DockerClientImpl.getInstance(config, httpClient);

// use it to wait for container completion
WaitContainerResultCallback resultCallback = new WaitContainerResultCallback();
dockerClient.waitContainerCmd(containerId).exec(resultCallback);

resultCallback.awaitCompletion(5000, TimeUnit.MILLISECONDS);
Conclusion
All secrets have been unveiled. With the five patterns presented above you should be ready to write your tests. For some more complete examples visit the demo project at Worldline - GitHub .
Take a final word of warning, while Testcontainers and Docker in general greatly lower the burden for writing network tests by relieving you of cleanup tasks, fostering test isolation, providing debug and IDE integration… it remains a complex topic. Finding issues is not simple, tests with multiple network hops are tedious to debug and you best go in baby steps, always securing and asserting a baseline before layering a change on top.
However, if you follow these guidelines automated network tests will allow you to hunt for some of the most nasty production bugs in your CI/CD pipeline or even on your development machine!