OpenID Connect and OAuth2 for the beginner

Introduction
Handling user authentication is common yet critical task in many apps. Developers and companies make an important effort to provide secure yet efficient approaches.
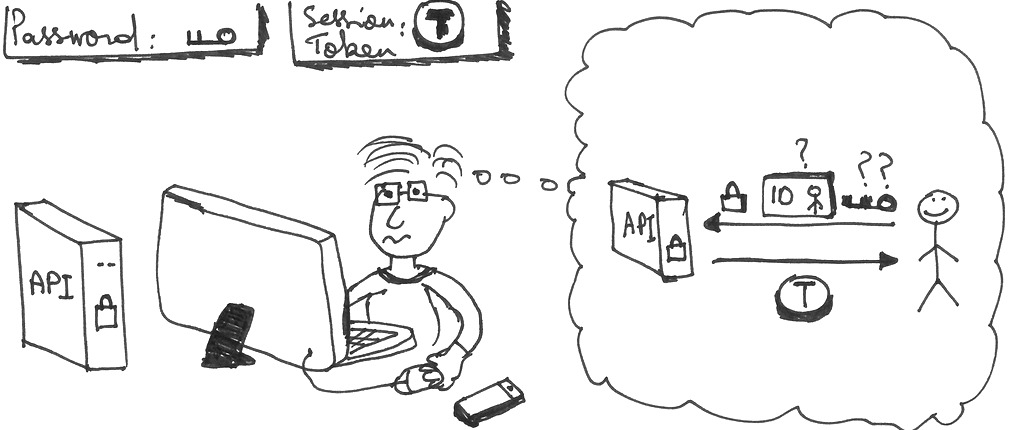
Generally, user authentication is handled by managing the credentials in an on-premises database as illustrated below. This implies an important responsibility for the maintainer of the database.
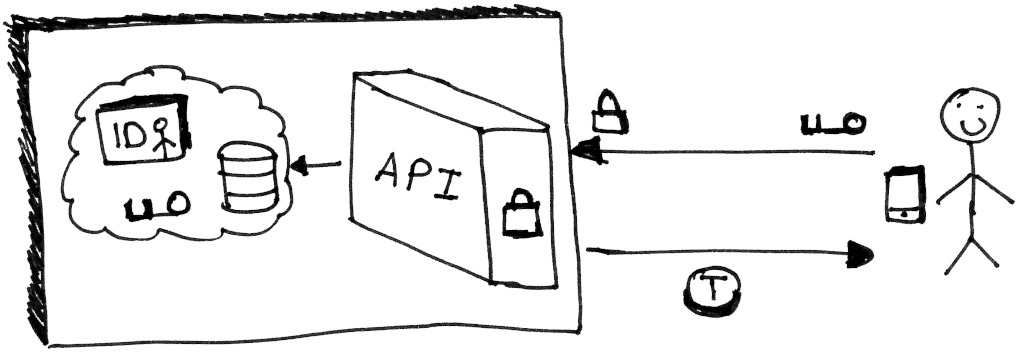
Another solution is to delegate authentication and authorization to a 3rd party entity. Then, we communicate with it using a well-defined standard such as OpenID Connect and OAuth2.
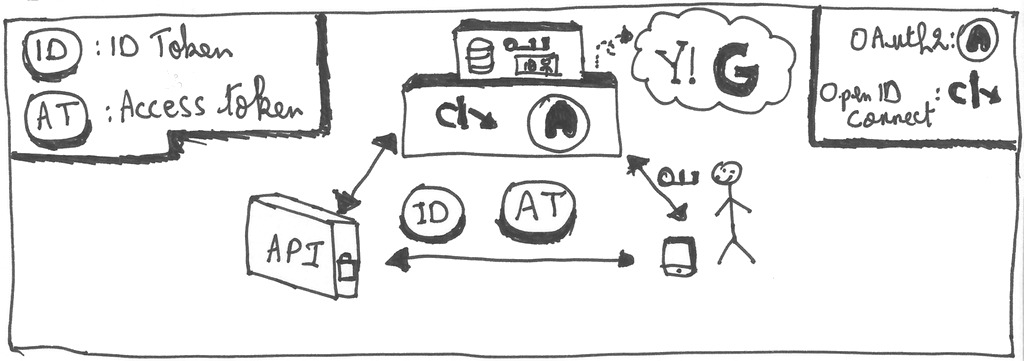
These standards are gaining popularity over the years and are the subject of this post. Let’s start by defining OpenID Connect and OAuth2 in the next section.
Definition
OpenID Connect, abbreviated OIDC, is a standard that allows a program, an application or a website to provide login functionality through a server which can be hosted by a different developer or organization.
OIDC does not define new protocols for every aspect of the authentication. Instead, it relies on OAuth2, which is a framework that defines how a user can get access to resources. It also and adds a layer that allows to identify the user and provides basic identification information.
(Identity, Authentication) + OAuth2.0 = OpenID Connect
Since some OIDC and OAuth2 terms are different, the following sections use OIDC terms. I will try to indicate the differences between OIDC and OAuth2 when possible. Rest assured anyway, there will be a section dedicated to OAuth
Speaking of which, the next section defines some OIDC terminology.
Some OIDC Terminology
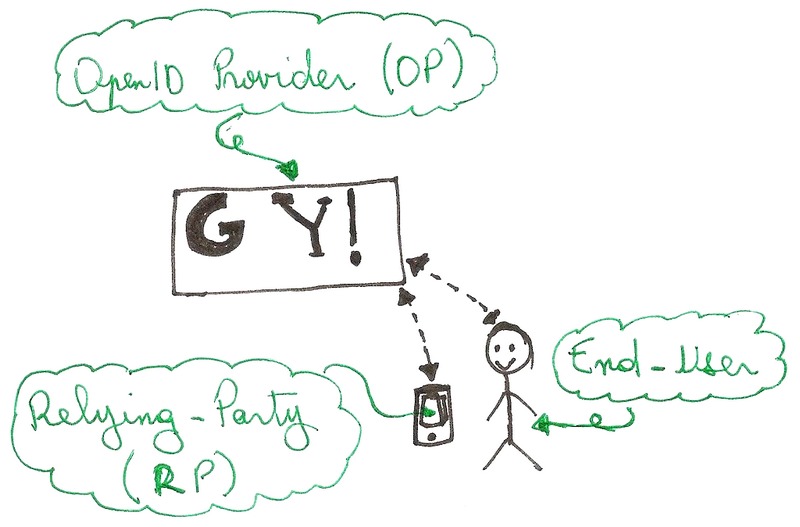
Here is some OIDC terminology related to the different actors:
- Relying Party or RP: is the application which delegates authentication to a 3rd party using the OIDC protocol.
- OpenID Provider or OP: is the 3rd party that provides authentication to a RP. For example: Google and Yahoo are well-known OPs.
- End-User: is the user that uses the app and enters his credentials to the OP when requested.
These actors are illustrated below.
Knowing the terminology is very important when dealing with OIDC (and OAuth2). In fact, many misunderstandings can be alleviated using a common language.
Armed with these new terms, we can study a typical OIDC scenario in the next section.
Typical use case (Authorization Grant Flow)
Our use case consists of a mobile app that shows some profile information of the authenticated user. The authentication is delegated to an OP that sends-back a code to the mobile app in case of success. This scenario is called Authorization Grant Flow.
This use case flows as follows:
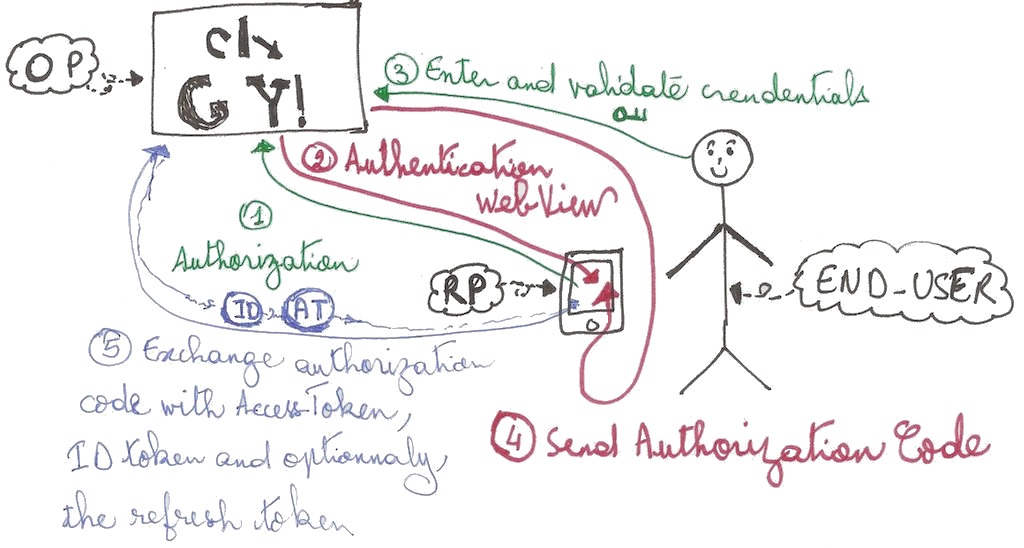
- The end-user opens the app and presses the log-in button. The app (which is a RP in the context of OIDC) requests the OP to authenticate the end-user using an authorization request. This request contains different parameters including a redirection URL that is important for later use.
- The OP shows a web-view that asks the end-user to login.The OP can ask the user for his login and password, his fingerprint or any other authentication mean used by the OP. The important point here, is that during this process only the OP manipulates personal data.
- The end-user logs in by following the instructions of the OP. Those steps depend on the OP implementation as specified earlier.
- When the authentication finishes, the OP notifies the RP thanks to the redirection URL. In case of success, this URL contains an Authorization Code.
- The RP exchanges the Authorization Code with an Access Token and an ID Token. At this step the RP notifies the end-user that the connection is successful and shows basic user information available in the ID Token.
This flow type is called Authorization Code Flow because the OP sends an Authorization Code to the RP during the redirection. OIDC (and also OAuth2) has other flows such as the Implicit flow and Hybrid flow. This humble introduction focuses mainly on the Authorization Code Flow.
During the Authorization Code Flow, the RP sends these requests to the OP:
- The authorization request which allows the OP to authenticate the end-user. Its result is an Authorization Code (AC) sent through the redirection URL
- The token request that exchanges the Authorization Code for an Access Token, ID Token and optionally a refresh token
Each of these requests is called an endpoint. OIDC (and also OAuth2) defines standard endpoints that every OP must provide. Every OP exposes its endpoints in a specific page which is also part of the OIDC standard. It’s a JSON file that contains the different endpoints as well as other information. The URL of this page is called the discovery URL. It allows a RP to dynamically obtain the relevant information about an OP such as the URLs of the authorization request and the token request. In OIDC terminology, these URLs are called endpoints
Here are some discovery URLs that you can check right now:
Here is a snippet of the Yahoo OIDC discovery showing some endpoints:
{
  "issuer": "https://api.login.yahoo.com",
  "authorization_endpoint": "https://api.login.yahoo.com/oauth2/request_auth",
  "token_endpoint": "https://api.login.yahoo.com/oauth2/get_token",
  "introspection_endpoint": "https://api.login.yahoo.com/oauth2/introspect",
  "userinfo_endpoint": "https://api.login.yahoo.com/openid/v1/userinfo",
  ...
}
I want to highlight a very important point: The PR is never aware of the end-user’s credentials! Instead, it gets an Authorization Code (AC) which is exchanged with an Access Token and an ID Token.
The different tokens and the AC are explained in the next section.
The Authorization Code and tokens
In OIDC (and OAuth2), different information may be sent by the OP to the RP: the Authorization Code, the Access Token, the refresh token and the ID Token. The first three ones come from OAuth2 while the last one is an addition of OIDC.
The Authorization Code
It is a string that is returned upon successful authorization by the end user. Its only purpose is to exchange it with an Access Token and an ID Token. The Authorization Code is mostly used Authorization Code Flow, as its name implies. Other OIDC flows may skip it entirely. Instead, they return the different tokens which we will explain next.
The Access Token
The Access Token is the information that allows to query other OIDC endpoints, such as the userInfo endpoint. It also allows accessing other protected APIs from the RP. For example, google allows to use the Access Token to query its protected APIs. The Access Token is not OIDC specific but emanates from OAuth2 as mentioned previously: (Identity, Authentication) + OAuth2.0 = OpenID Connect.
The refresh token
The refresh token is used to obtain a new ID or Access Token. This avoids repeating the authentication step when they expire. However, the refresh token may cause dangerous security breaches and must be manipulated with caution.
It is strongly recommended to not use at all refresh tokens in web apps or mobile apps because they are stored locally on the device. If a hacker obtains it, he could generate as much as ID and Access Tokens as he wants until the session is invalidated on the server.
As opposed to client apps, it’s relevant to use the Refresh Token in apps hosted on servers (such as JEE or ASP). Firsly, because it is much more difficult to attack and secondly because it removes the need to repeat the authorization request.
The ID Token
The ID Token is a JSON Web Token (JWT) that encodes JSON data about the end-user and about the authentication itself.
Each field of the ID Token is called a Claim. OIDC defines standard claims and it’s possible to provide custom ones. Here is a sample ID Token:
eyJhbGciOiJSUzI1NiIsInR5cCIgOiAiSldUIiwia2lkIiA6ICJCcGFDMXItMVFRSEdJbVV5SnQ1dlJGMHYtbGlvbjROblkyaEREY1hUMUtzIn0.eyJqdGkiOiIxNTE1OWI1OC1hMjQxLTQ4YWQtYmNjMS1hYmQwMTUyZDk5YTIiLCJleHAiOjE1NDAyNDQwMTcsIm5iZiI6MCwiaWF0IjoxNTQwMjQzNzE3LCJpc3MiOiJodHRwczovL3Nzby1vaWRjLXRlc3QuMWQzNS5zdGFydGVyLXVzLWVhc3QtMS5vcGVuc2hpZnRhcHBzLmNvbS9hdXRoL3JlYWxtcy9kZW1vIiwiYXVkIjoiY2xvaWRjIiwic3ViIjoiNmIzNWI5ZjMtMzQ3YS00MDhhLWFmMWUtYTdiMDU3M2ZlZTQ4IiwidHlwIjoiSUQiLCJhenAiOiJjbG9pZGMiLCJhdXRoX3RpbWUiOjAsInNlc3Npb25fc3RhdGUiOiJhOTNkNDBjNS0zMTliLTQxMjQtYTQxYS0xMjYyZjU5NWNlMGIiLCJhY3IiOiIxIiwicHJlZmVycmVkX3VzZXJuYW1lIjoidHV0dSJ9.UNQeHa69iVy_BbHRH0lydZ83PDYNN1QzxbozWFObhyJIJ8WJzvbMomYHL2To_5zOJ79fNXcVHWIosfbEyz3RrKJ0SvBfrr6Q9gIQnZYWp91_Ky_TRIt5p2lhumAVSPeZSxgWYCUt9nQgGu_4FAaUcH_xS_499x4yu5cA82gWQUYLw6wrIF-PLwAsAwfibdIV8-3lByA4X9tksuFOEtqzr96FLbNnZ6zldytwJffOYsBRT7efbfKAKgeboT9V1y6Wtf95EsUQkhzRmnaWs-u07xi9IryassoeNMOnaMw0LGvImkcPyqQvcnxtLE4eL4OkWIi7MYqYkIW-kW0YdZrKFw
Since it’s a JWT, it can be decoded using jwt.io , or the pyjwt command or any other JWT decoder.
The result of the payload is this JSON object:
{
   "sub" : "6b35b9f3-347a-408a-af1e-a7b0573fee48",
   "nbf" : 0,
   "azp" : "cloidc",
   "preferred_username" : "tutu",
   "session_state" : "a93d40c5-319b-4124-a41a-1262f595ce0b",
   "aud" : "cloidc",
   "auth_time" : 0,
   "iat" : 1540243717,
   "jti" : "15159b58-a241-48ad-bcc1-abd0152d99a2",
   "iss" : "https://sso-oidc-test.1d35.starter-us-east-1.openshiftapps.com/auth/realms/demo",
   "acr" : "1",
   "typ" : "ID",
   "exp" : 1540244017
}
The UserInfo endpoint has more claims than the ID Token. Thus, it is not necessary to call the userInfo endpoint unless we want a claim not provided by the ID Token.
We may not notice, but at this point, many OAuth2 concepts were also covered. The next section highlights OAuth2 specifics.
OAuth2
OAuth2 is an industry standard for authorization. It explains a standard way in which apps can request access to protected resources from a 3rd party on behalf of the Resource Owner. This is also called delegation of authorization.
OIDC and OAuth2
OIDC is layer on top of OAuth2. The main difference between OAuth2 and OIDC is that the former provides authorization (is the user can access a resource) while the latter provides authentication (who is the user). Thus, OAuth2 defines the Access Token and the refresh token while OIDC adds the ID Token and the userinfo endpoint.
Nowadays, we may find OAuth2 implementations that do not support OIDC and do not provide the ID Token. These implementations can provide identification information through OAuth2 without OIDC in a nonstandard way. For example, Facebook login relies on OAuth2 but still provides some identification information.
In addition to the ID Token, OIDC standardizes other elements that were not standardized by OAuth2 (scopes, endpoint discovery, and dynamic registration of clients).
In terms of terminology, OAuth2 has a different vocabulary than OIDC. This may be annoying sometimes but is not insurmountable. Here are some of them:
- Authorization Server: the server that provides authorization (the Access Token mainly) and implements the OAuth2 protocol
- Resource Owner: the registered user that has protected resources
- The client application: the application that requests authorization and protected resources on behalf of the resource owner
- Resource server: the server that provides protected resources in exchange with an Access Token. It can either be merged with the authorization server or a totally separate entity (such as a REST API provided by the Client application developer).
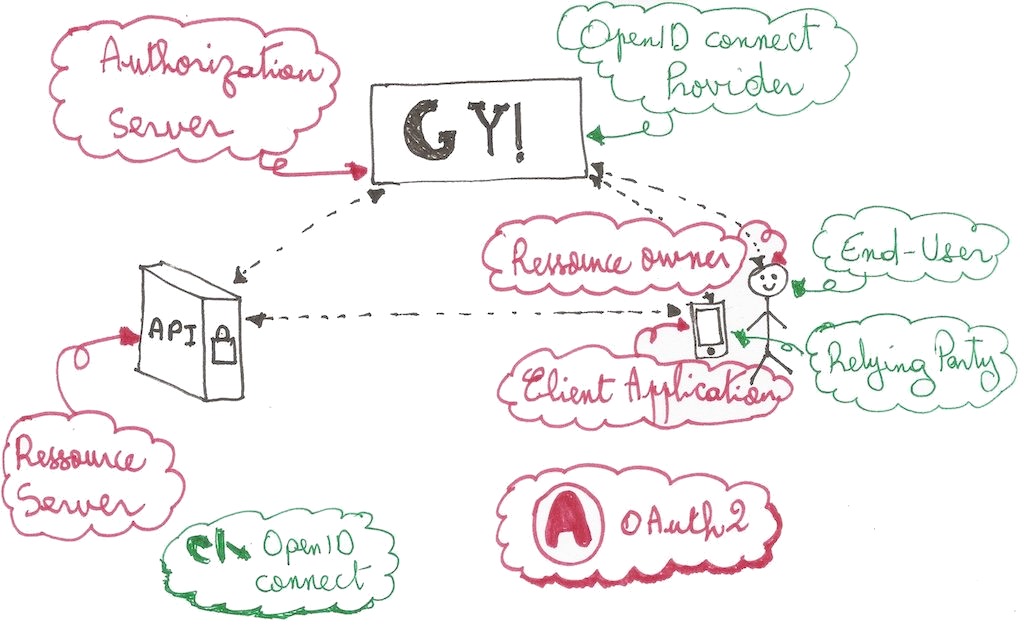
The following table maps OAuth2 to OIDC terms:
| OAuth2 | OpenID connect |
|---|---|
| Client Application | Relying party |
| Resource Owner | End-user |
| Authorization Server (OIDC not implied) | OpenID Connect Provider |
| Resource Server |
OIDC does not have a vocabulary related to the resource server because it focuses on identification side.
Calling a protected API using OAuth2/OIDC
Up until now, we have put aside the communication with any protected REST API. This was purposely done for different reasons. The first one is to avoid addressing authentication and authorization at once. The second one is that this part is related to the authorization which is originally provided by OAuth2. Now that we have basic knowledge about OAuth2, I can suggest a common way for communicating with a protected API which is valid in both OIDC and OAuth2 worlds.
Basically, a protected API requires some kind of authorization process before allowing the user to access the resource. This can be achieved in different ways, for example by sending credentials or a specific token in the request parameters. The server then checks the validity of authorization information and replies to the client back by either a success response or by an access denied response.
In OAuth2/OIDC, the authorization information is the Access Token. The following figure illustrated calling a protected API using the Access Token.
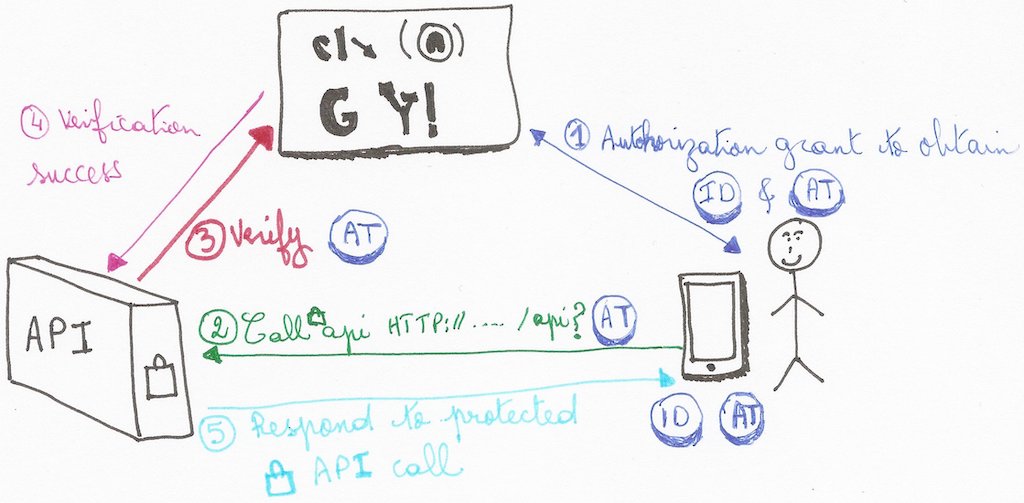
- The client application authenticates the user with either OAuth2 or OIDC protocols using one of the available flows (for example the authorization grant flow that we have seen earlier)
- The client application sends a request to a protected API on the Resource Server (RS) by setting the Access Token prefixed with the word bearer in the Authorization header, for example:
Authorization: Bearer 0b79bab50daca910b000d4f1a2b675d604257e42 - The RS (the API server) detects and validates the access token. The validation ensures that the Access Token is correct and comes from an authenticated user. There is no standard way to validate Access Tokens , but there are ways to perform this task depending on the Authorization Server (AS) and the developer effort. For example auth0.com describes and details how to validate the token provided by its AS.
- Once the token is validated by the RS with the help of the AS, the former prepared the response of the protected API request that came from the client application.
- The last step consists of sending the response to the client app. This showed how we can use OAuth2 to request for protected resources in the RS.
The above steps showed one way of doing things. The relevant steps here are the Authorization header and the validation steps. We may imagine other solutions depending on the context (for example, exchange Access Token with a session token managed internally by the RS).
We have covered many theoretical aspects of OIDC and OAuth2. With all this acquired knowledge, you can jump into the practical aspects with more confidence. The next section helps you get started on implementing you own OpenID provider (OP) / Authorization server and Relying Party (RP) / client application.
Implementing an OIDC RP and OP
The next two sections provide tips and guidance that allow implementing a RP and an OP. In the following a RP will be called a client or an OIDC client.
Depending on your need and use case, you may implement an OIDC client or OP or both.
The official OIDC website lists certified client/server libraries .
The following paragraph gives a brief explanation of OIDC clients.
OIDC RP libraries
An OIDC client is able to communicate with an OP. It does so by requesting the authorize and token endpoints that allow to obtain the different tokens. The Access Token may be used to get user information through the userinfo endpoint or request other APIs as long as they support the Access Token as an authorization data.
In terms of security and implementation, there are two great families of OIDC clients:
- Server apps and traditional web apps (or server web apps): server side are globally closed to the outside world and offer none or a few entry points through APIs for example. The authorization grant type with client secret and the password grant type are allowed for this kind of clients.
- Single page apps, desktop apps and mobile apps: these apps are executed on the client side (as a native app or on a browser). Thus, exchanging secret information is forbidden in this case. The only two recommended grant types are the authorization grant without user secret and the implicit grand. For example, the AppAuth SDK for Android supports only the authorization grant without user secret.
Note: There are security aspects that must be considered, but they are out of the scope of this humble introduction
Fortunately, thanks to the popularity of OIDC, we can fairly easily find SDKs and tutorials that help us implement an OIDC client. For example, the AppAuth SDK for iOS and Android provides a simple interface for requesting endpoints and persisting authentication information. It also handles all interaction with the OP for us.
Here are some SDKs for implementing an OIDC client or RP:
- Server apps and server-side web apps:
- PHP: PHP OpenID Connect Basic Client
- Node: Node openid-client
- JEE + Spring: OAuth2.0 Login Sample
- Client-side apps (Single page apps, desktop apps and mobile apps):
- iOS and macOS: AppAuth for iOS and macOS
- Android: AppAuth for Android
- Javascript: AppAuth for JS
- Angular: angular-auth-oidc-client
Many more libraries and code samples are available. I have also developed bash scripts that play with OIDC using cURL that retrieves an access code and request the different tokens .
The next section provides some tracks for building an OIDC provider.
Building an OIDC OP
As the famous motto says “Don’t reinvent the wheel”, I am not going to show how to build an OP from scratch. In fact, there are already several implementations available divided into two categories. The first one is OP libraries that can be plugged to an existing server to provide OP features. The second is a complete stand-alone OP server.
Similarly to RP, the official OIDC website provides links to reference implementations for both servers and libraries .
One famous server is Kecloack which provides an very user friendly UI for configuring nearly every aspect of it.
In addition to that, the free plan of Redhat OpenShift allows to easily deploy a Keycloack server. So, there is no excuse to start toying with OIDC.
It is now time to conclude this post.
Conclusion
OpenID Connect and OAuth2 are protocols that allow developers to delegate authentication and authorization to a third party entity. This article explained some key principles and terms related to those technologies such as the Access Token and the Relying Party. It also illustrated a common use case of a mobile app using the authorization grant flow. The next step consists of putting all that into practice. For that goal, I provided some useful links. Maybe I’ll write another tutorial about that :smile:.
Links
- https://openid.net/connect/
- List of public OpenID Connect providers
- OpenID Connect (Authorization Code Flow) with Red Hat SSO
- Execute an Authorization Code Grant Flow
- Trying out OAuth2 via CURL
- CURL output to display in the readable JSON format in UNIX shell script
- Assigning the output of a command to a variable
- How to parse JSON string via command line on Linux
- pyjwt
- Identity, Claims, & Tokens – An OpenID Connect Primer, Part 1 of 3
- Why use OpenID Connect instead of plain OAuth2?
