New Web payment standards
Context
The W3C (which stands for World Wide Web Consortium) has initiated several working groups to standardize web payments and make them easier and more secure, especially on mobile devices. By the end of 2018, all major browsers will support W3C Web payment APIs.
In parallel, a new revision for the Payment Service Directive (PSD2) is adopted by the European Parliament and requires banks to grant Third Party Providers online access to customer’s account thus allowing to conceive new payment.
In this article and the associated video we will see how we can develop a demonstration that combines these standards to create a new payment experience on the Web.
Illustrating 3 W3C browser APIs
- Payment Request API:
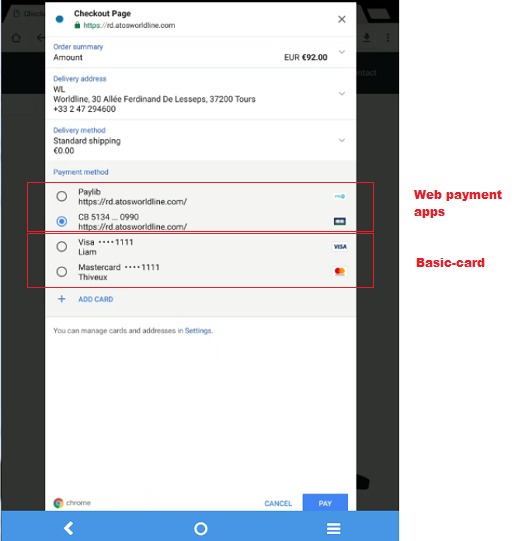
This API allows the User Agent(browser) to act as an intermediary between merchants, users, and payment method providers. It enables browsers to streamline the user’s payment experience by taking into account user preferences, merchant information, security considerations, and other factors. It standardizes the communication flow between a merchant, user agent, and payment method provider.
This API also enables web sites to take advantage of more secure payment schemes (e.g., tokenization and system-level authentication) that are not possible with standard JavaScript libraries. This has the potential to reduce liability for the merchant and helps protect sensitive user information. For example, the W3C is currently working on another embedded payment method (such as ‘basic-card’ for credit and debit cards) to enable payment with a tokenized-card .
Read more about the Payment Request API
- Payment Handler API:
This API defines a number of new features to allow web applications to handle requests for payments on behalf of users:
- An origin-based permission to handle payment request events.
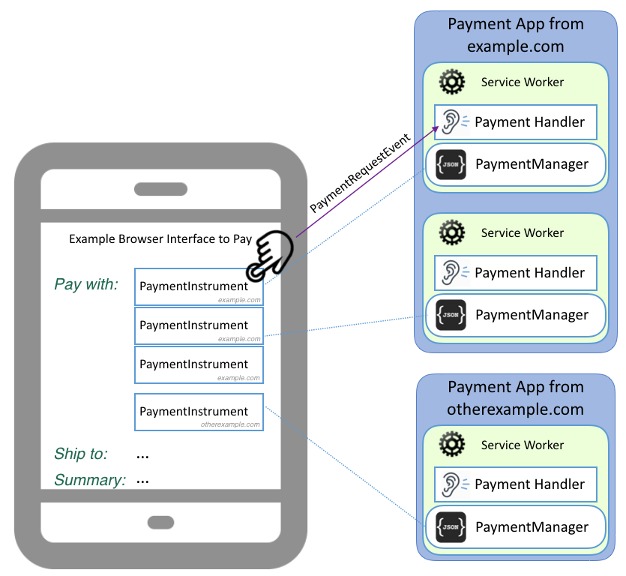
- A payment request event type (“PaymentRequestEvent”). A payment handler is an event handler for the PaymentRequestEvent.
- An extension to the service worker registration interface (“PaymentManager”) to manage the definition, display, and user selection of PaymentInstruments.
- A mechanism to respond to the “PaymentRequestEvent”.
Overview of handling payment request:
For instance, a user visiting a retail or bank website may be prompted to register a payment handler from that origin. The origin establishes the scope of the permission but the origin’s capabilities may evolve without requiring additional user consent.
Payment handlers are defined in service worker code. During service worker registration, the PaymentManager is used to set:
- A list of enabled payment methods.
- [Optionally] the conditions under which the handler supports a given payment method; these capabilities play a role in matching computations.
- Information used in the display of instruments supported by the payment handler.
When the merchant (or other payee) calls the “Payment Request” method “show()” (e.g., when the user pushes a button on a checkout page), the user agent computes a list of candidate payment handlers, comparing the payment methods accepted by the merchant with those supported by registered payment handlers. The user agent displays these choices using information (labels and icons) provided at registration or available from the Web app.

When the user (the payer) selects an instrument, the user agent fires a “PaymentRequestEvent” in the service worker whose “PaymentManager” the instrument was registered with. The PaymentRequestEvent includes some information from the PaymentRequest (defined in Payment Request ) as well as additional information (e.g., origin and selected instrument).

Once activated, the payment handler performs whatever steps are necessary to handle the payment request, and returns an appropriate payment response to the payee. If an interaction with the user is necessary, the payment handler can open a window for that purpose. The user agent receives a response asynchronously once the payment handler has finished handling the request. The response becomes the “PaymentResponse” (of Payment Request).
Read more about the Payment Handler API
- WebAuthentication API:
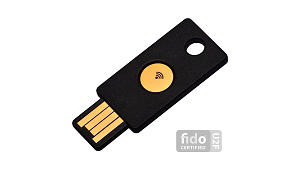
This API enables the creation and use of strong, attested, scoped, public key-based credentials by web applications, for the purpose of strongly authenticating users. It allows users to register and authenticate with web applications using an authenticator such as a phone, hardware security keys, or TPM (Trusted Platform Module) devices. This means that, with devices like a phone or a TPM, where a user can provide us with biometric verification, we can use “WebAuthn” to replace traditional passwords. Aside from user verification, we can also confirm the ‘user presence.’ So if users have a U2F token like a Yubikey , we can handle that second factor of authentication through WebAuthn API as well.
While “WebAuthn” is drafted to be an open-ended credential creation and management API capable of handling many different types of credentials, right now, it is written to handle registration and authentication to a web application. The credentials created through the WebAuthn API rely on strong cryptographic principles and asymmetric encryption. So when we talk about credential registration and authentication, know that the credentials we are using are actually public and private key pairs.
The WebAuthn specification is still in progress, only the registration/authentication with a Yubikey is implemented into browsers.
In our demo, we used a Fido key equivalent to the Yubikey Neo.

Read more about the WebAuthn API
The demo we developped:
This video illustrates how a web payment looks like using the APIs mentionned above.
In this case, we want to pay with a Web application from our bank: Wordline bank. The first step is to go to worldlineBank.com and install the web payment app in the browser, basically a credit card. (Payment Handler API)
On this same page we can register a Security key that we will use to authenticate and confirm the payment. (WebAuthn API)
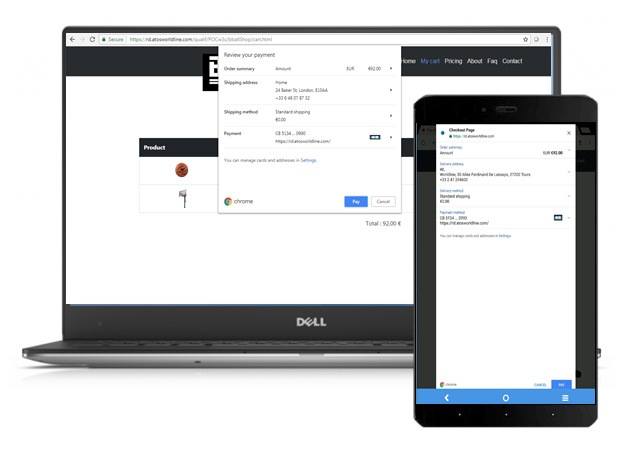
Back on the merchant website, the “Pay” button triggers the Payment Request API displaying the payment method we registered (if they are supported by the merchant) so we select the card we just registered and we continue.
Then the WebAuthn API is used to authenticate the user and conclude the payment and the strong authentication with 2 factors:
- 1st, a password
- 2nd, the Security key we registered.
This is what the payment process looks like with the Payment Request allowing Web Payment Application through the Payment Handler API and with the WebAuthn API to authenticate and complete the transaction.
Do it yourself:
Let’s deep dive into the W3C APIs code and how you can add/create your own Web Payment app.
Step 1: The Manifest File
How will we recognize your web application ? With a name and a logo ! This is specified in a Web app manifest file
Manifest.json
{
  "name": "CB 5134 ... 0990",
  "icons": [{
    "src": "CB.png",
    "sizes": "600x600",
    "type": "image/png"
  }]
}

Because it is called a Web app manifest, let’s call it “manifest.json” and place it on the web server. Point to the file from the HTML where you install your web payment app.
Chrome will download this manifest during the payment app installation. Simply insert this “link” element.
<link rel="manifest" href="/manifest.json">
Step 2: Install a payment app
Installing a payment app is basically registering a Service Worker. Write your service worker in a separate JavaScript file “service-worker.js”.
install-cb.js
// Check if service worker is available
if ('serviceWorker' in navigator) {
  // Register a service worker
  const registration = await navigator.serviceWorker.register(
    // Location of the separate service worker JS file
    'service-worker.js'
  );
  // Check if Payment Handler is available
  if (!registration.paymentManager) {
    return;
  }
  registration.paymentManager.instruments.set(
    // Payment instrument key can be any string.
    "cb handler",
    // Payment instrument detail
    {
      name: 'From the manifest anyway',
      // A supported payment method identifier
      enabledMethod: ['https://rd.atosworldline.com/qualif/POCw3c/webauthn/basic-card-app'],
    }
  )
}
Step 3: Write the service worker
We wrote down how to install this service worker in the browser, so now we need to dive into the service worker code itself.
service-worker.js
let payment_request_event;

//Check if it supports Payment Request API
self.addEventListener('canmakepayment', (evt) => {
  evt.respondWith(true);
});

self.addEventListener('paymentrequest', function(e) {
  // Preserve the event for future use
  payment_request_event = e;
  //Creating a promise that resolves when payment is done
  e.respondWith(new Promise(function(resolve, reject) {
      //Listening to message from the opened window
      self.addEventListener('message', listener = function(e) {
          //Check if the opened window sent that it was ready
          if (e.data == "payment_app_ready") {
            // Send data to the window
            windowOpened.postMessage({
              data: payment_request_event.methodData[0].data,
              total: payment_request_event.total.value,
            });
          } else {
            if (e.data.methodName === methodName)) {
            reject(e.data);
          } else {
            resolve(e.data);
          }
        }
      }); e.openWindow("https://rd.atosworldline.com/qualif/POCw3c/webauthn/basic-card-app/card1/CVC.html").(function(windowClient) {
      windowOpened = windowClient;
      windowClient.postMessage({
        data: e.methodData[0].data
      });
    })
    .catch(function(err) {
      reject(err);
    });
  })
});
Step 4: The opened window
Basically, the opened window will be the interface the user will interact with. In this example, it opens a Wordline Bank page where you need to strongly authenticate (Password + Fido Key) to confirm payment. Let’s do something easier so you can checkout the user experience of your own web payment app. So let’s keep the password but remove the Webauthn/Fido key part.
<div id="divAuthentication" class="centre">
  <p id="title" name="title">Please type your bank account password</p>
  <p><input required type="password" name="password" id="password" value=""> </p>
  <input class="btn btn-lg btn btn-primary" type="submit" name="validate" id="validate" value="Authenticate" onclick="check();">
</div>

<script type="text/javascript">
function check() {
  //Only check that it's not null
  if (document.getElementById("password").value) {
    //Sweet alert display, nice and customizable alert
    swal({
        text: 'Authentication successful',
        icon: 'success',
      })
      .then(function() {
        //Send payment response if authentication is successful
        payer();
      })
  } else {
    swal("Wrong Login or Password", "error");
  }
}
</script>
Here is how to complete the payment by sending the PaymentResponse to resolve the promise.
// Send to the service worker the payment app is ready
navigator.serviceWorker.controller.postMessage('payment_app_ready');

var messageSRC;
var cardNumber;
var expDate;
navigator.serviceWorker.addEventListener('message', function(e) {
  //retrieve data send by the serviceWorker and keep it for later
  cardNumber = e.data.cbNumber;
  expDate = e.data.date;
  messageSRC = e.source;
});


function payer() {
  var expMonth = expDate.month;
  var expYear = expDate.year;
  //Define all the data you need to send back to the payment request
  var paymentAppResponse = {
    methodName: 'cb handler',
    details: {
      methodName: "cb handler",
      cardNumber: cardNumber,
      cardSecurityCode: cvc,
      cardHolderName: cbName,
      expiryMonth: expMonth,
      expiryYear: expYear,
      billingAddressRequired: billingAddress
    }
  };
  //Send it back to the service worker source
  messageSRC.postMessage(paymentAppResponse);
  //Closes the opened window to conclude payment
  window.close();
}
Step 5: The payment Request
If you want to display the payment request when a user checkout, you need to use the Payment Request API, here’s how to do so.
// Use Payment Request API if the merchant implemented it
if (window.PaymentRequest) {
  // Create the payment request object
  let request = initPaymentRequest();
  //Display it
  request.show().then((paymentResponse) => {
      //Get the details from the 'PaymentResponse' and complete the transaction
      return paymentResponse.complete();
    })
    .catch(function(err) {
      ChromeSamples.setStatus(err);
    });
};
} else {
  // Fallback to traditional checkout
  window.location.href = '/checkout/traditional';
}

function initPaymentRequest() {
  const supportedInstruments = [{
      //embedded method to support credit and debit cards
      supportedMethods: 'basic-card',
      data: {
        supportedNetworks: ['amex', 'mastercard', 'visa', 'discover'],
        supportedTypes: ['debit', 'credit', 'prepaid']
      }
    },
    {
      supportedMethods: 'https://rd.atosworldline.com/qualif/POCw3c/webauthn/basic-card-app',
      data: {
        //Optional data
      }
    }
  ];

  let details = {
    total: {
      label: 'Total',
      amount: {
        currency: 'EUR',
        value: 92.00
      }
    }
    shippingOptions: [{
        id: 'standard',
        label: 'Standard shipping',
        amount: {
          currency: 'EUR',
          value: '0.00'
        },
        selected: true,
      },
      {
        id: 'express',
        label: 'Express shipping',
        amount: {
          currency: 'EUR',
          value: '12.00'
        },
      },
    ],
  };

  // Options isn't required.
  const options = {
    //You can add shipping options
    requestShipping: true
  };

  new PaymentRequest(
    supportedInstruments,
    details,
    options
  );
}
Step 6: Enjoy the user experience


