Progressive Web Apps
Introduction
Innovation in the front-end web development world can sometimes be seen as an endless and uncontrollable flow going in all directions without any form of organization or apparent master plan. Certainly, it is very difficult to keep track of all the new API and tools coming out every week. However, much of this noise is actually irrelevant when it comes to identify the global trends; the ideas that will get traction and be implemented at a large scale, defining the next status quo for the user experience on the web.
Most of these trends are not related to a revolutionary product or a new web feature, but rather a natural response to a massive shift in the way people are using the Web platform. This response often involves changing our methodology as website designers and developers, and using not one but a combination of the tools and features among those we have at our disposal.
One of these trends, between 2010, and 2015 has been Responsive Web Design. During this period, many companies were struggling to recover from the mobile revolution hangover: reviewing the early results of their iOS/Android native app, or considering what to do with this shrunken m. version of their website. Latecomers were less tempted to jump in with both feet, since the competition between mobile platforms was at its peak and new intermediate devices like tablets were arriving at the table. In this context, cross-platform websites were the perfect answer, but somehow considered as an unattainable goal for many, even if the CSS parts required were ready and steady. It only started to get traction when someone decided to put a name on it: Responsive.
The lesson here is that the way we communicate about a technology is at least as important as the tech itself. New concepts require new words. The wording in itself is not as important as the necessity to bring a new, specific vocabulary to illustrate a paradigm shift. Some people will decry what they call bad marketing and buzzwords, but it appears to be an essential step to democratize these innovations.
Which brings us to Progressive Web Apps (PWA), another meaningless yet fascinating buzzword. The wording comes from progressive enhancement, a very simple and abstract principle we have been using for years in front-end development. Nothing that informs us of the concrete added value of these PWA over traditional web apps. And it does not matter. We just needed an acronym to search on Google and centralize the attention around all these various, boring technical details that once put together will dramatically improve a website. Google, by the way, led this huge communication and marketing effort around PWA (sometimes causing misunderstandings, but we will get back to that later).
It is very easy to describe the goals of a PWA, yet very difficult to agree on a list of criteria to fulfill in order to consider these goals achieved. Basically, Progressive Web Apps aim to fill the gap between native and web applications, by making web apps fast, reliable and more deeply integrated into the system. There are numerous ways to progress towards these goals, especially when it comes to performance. However, we can identify two new interfaces as strict requirements to make a web app truly progressive: the Service Workers and the App Manifest. The first is a blessing for network resilience and opens the door for offline usage, while the second lets you install and manage a web app just like you would do with a native one. We will focus on these two fellows in this article, but keep in mind that they are only a part of the whole story.
Before getting into action, we need to eliminate some misconceptions around PWA:
- PWA are not useful for a specific kind of website, but instead aim to raise the bar for the whole industry, and define a new standard level of quality to expect from a website, just like Responsive Web Design did before;
- PWA do not involve any kind of proprietary API; they are built on web standards and do not belong to any company in particular. Google, Microsoft and Mozilla are working together to bring traction and improve the integration on their respective platforms;
- PWA are not dedicated to mobile, for instance they are integrated in Windows 10 App store and in Chrome OS laptops. However, it is true that the added value of PWA is particularly sensible with mobile usage, where performance and network reliability is an everyday problem;
- finally, PWA are definitely not related to Google Accelerated Mobile Pages (AMP) ; the AMP team has communicated about ways to add PWA features to AMP applications, but that’s all.
Now that the presentations are done, let’s go deeper into the fundamentals.
What is a PWA?
A PWA is an application which offers a user experience that combines the best of the web and the best of the native application.
An application can be considered as a PWA if it meets the following criteria:
- Progressive:
The word Progressive in Progressive Web Apps is a reference to the Progressive Enhancement strategy. The objective of progressive enhancement is to make content and services accessible to every audience.
So PWA have to work on any device and enhance progressively, taking advantage of any features available on the user’s device and browser.
- Responsive
The UI of a PWA must fit any size and form screen.
- App-like
The UX of a PWA should look like a native application. A PWA should use the same concepts as a native application in terms of interface, navigation and interaction.
Furthermore, a PWA should be built on the application shell model, like a native application and can be installed on the device’s home screen.
- Reliable
A PWA must load instantaneously, independently of network conditions, or offline.
- Secured
Because all network requests can be intercepted through service workers, it is imperative that the app be hosted over HTTPS.
- Discoverable
A PWA should be discoverable in search engines. This is a major advantage over native applications, which still lag behind websites in searchability.
- Re-engageable
Like a native application a PWA should have re-engagement features, like push notifications, to encourage users to reuse them.
- Linkable
A PWA must have shareable URLs as for a classic website.
How it works?
To fulfill the above criteria, a PWA can use several tools and technologies.
These are the most common.
Service workers
Service workers (SW) are a new API with great potential. Like Web Workers, they are JavaScript programs running on a different thread than the application thread, and can keep running in the background when the browser is closed.
A service worker can be considered as a proxy between your PWA and the network. It can intercept and modify all the requests that are sent by the browser. It can perform URL redirection or generate responses with files and cached data.
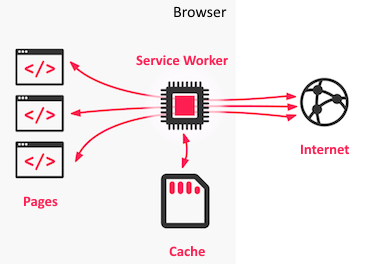
Therefore, it is a key element for offline usage, but also:
- Send push notifications.
- Background data synchronization
- Reply to requests coming from other domains
- Centralize the reception of data that is computation expensive, such as the geo-location or the gyroscope. This allows different pages to share the same set of data (which is also computed by a single object)
- Perform compile and build processes on the client side: TypeScript, PostCSS, Babel, etc.
- Handle custom templates based on URL patterns
- Improve performance, by pre-loading resources for example
Application Shell
The application shell architecture is a simple design principle in which the PWA initially loads a shell from the interface, before loading the content. An application shell is the minimal HTML, CSS, and JavaScript powering a user interface.

Ideally the Shell application is cached, with service workers for example, to be available very quickly when the user returns to the PWA. Having the shell and content loaded separately gives the user an impression of the application’s performance and usability.
Data cache
A cache consists of the backbend data that is stored locally, either fully or partially.
Web browsers have different JavaScript APIs that allow to store data for a short or long duration, locally on the user’s device. Using these caches is obviously essential in order to add offline to a PWA. In addition to that, caches can be used to optimize the application by avoiding redundant requests and by implementing strategies for latency compensation.
All browser caches are isolated by browser, user account and domain name. It is not possible to interact with the cache of another domain or another browser. On the other hand, these caches are synchronized if multiple tabs for the same domain are opened.
LocalStorage
The LocalStorage is a very simple but limited storage. It stores data using a key-value pair structure (associative table like a hashmap). Read and writes are performed synchronously. LocalStorage entries are persisted on the user’s drive, without any expiration delay.
SessionStorage
SessionStorage is an API which is very similar to LocalStorage with the exception that it stores data temporarily. The cache is in fact cleared when the browser is closed.
IndexedDB
This API provides a substitute to a database that is stored on the user’s hard drive. It allows to perform selection requests on structured data using JavaScript. It is event-based and works with web workers and service workers. It is largely supported nowadays.
Cache API
Dedicated to the HTTP request/response couples, cache API can be provided by Service Workers for example.
Manifest
The PWA manifest allows the system to retrieve contextual information on the currently opened website. It’s a simple JSON file that contains metadata about the application. These metadata are used to integrate more efficiently the PWA with the target platforms.
It also allows it to perform tests over its features and content, then eventually to suggest its installation alongside other apps (native apps and PWA).
This process is popularized on Android with the denomination Add to home screen that originates from the label of the same action.
Push notifications
It is possible to send push notifications using JavaScript in different ways:
- Directly via the application when the web page is opened.
- Using a Service Worker that is registered for sending push notifications. This works even when the application is closed.
These notifications are multi-platform and adapt to the target platform; Android notifications or Windows 10 notifications for example.
The push API allows a Service Worker to present push messages from the server to the user, whether the web page is loaded or not. This implies using a push service such as Firebase Cloud Messenger (FCM, previously GCM).
The process is carried out in the following way:

- An active service worker subscribes to the push server using the method
pushManager.subscribe()which returns a Promise ofPushSubscription. - The
PushSubscriptionobject has the notable property endpoint which is the subscription URL. We store this one in the server (back-end). - When the server wants to send a push notification, it reuses the stored endpoint URL and sends a request to the push server.
- The push server then takes care of sending the push notification to the user.
Search Engine Optimization
The Search Engine Optimization (SEO) techniques do not differ too much between a Progressive Web App and a regular single page web application.
There are some simple rules to remember to ensure your PWA content will be indexed properly:
- Make sure every page to index has its own URL
- Use the History API instead of hashbangs
- Use Server-Side Rendering (SSR) to enables indexing for crawlers that do not support JavaScript or AJAX.
- Follow responsive web design recommendations
Build a PWA from scratch
This guide will help build a very simple PWA from scratch, with the intent of showing you only the PWA related code. Thus, no frameworks or code generators will be used. The HTML and CSS content will be very minimal. This will allow to focus only on the parts that are PWA related. We are going to practice the following features:
- Add shortcut to homescreen
- Splachscreen
- Service worker
- Caching
Before getting into the code, let’s prepare our workstation with the necessary elements.
Requirements
We are going to use Visual Studio Code IDE along with these languages: HTML 5, CSS3 and EcmaScript 6. Here is the setup that I recommend for this tutorial:
- Visual studio code or VS Code
- The following VS Code extensions
- Live server : it allows to run the current workspace on a local server with a single button click.
- Optionally, JavaScript Snippet Pack or any other extension that you prefer to use for web projects.
- A JSON API that is ready for use. Hopefully, there is a GitHub repository that categorizes some public APIs . In this guide, we are going to use Jikan API
- Latest version of Chrome because we will be using its powerful PWA developer tools
Once everything is setup and ready, we can initialize the first lines of code.
Step1: the app shell
Let’s start with building the app shell. Briefly, it is the minimal HTML/CSS/JavaScript that powers the user interface.
<!DOCTYPE html>
<html>

<head>
    <meta charset="utf-8" />
    <meta http-equiv="X-UA-Compatible" content="IE=edge">
    <title>Page Title</title>
    <meta name="viewport" content="width=device-width, initial-scale=1">
    <link rel="stylesheet" type="text/css" media="screen" href="main.css" />
    <script src="main.js"></script>
</head>

<body>
    <div>
        <input id="anime_id_input" placeholder="Anime id" />
        <button id="ok_button" onclick="onOkButtonClickAsync()">OK</button>
    </div>
    <div id="main_anime">
    </div>
    <h1>History</h1>
    <div id="history">

    </div>
</body>

</html>
#history {
    display: flex;
    flex-direction: row;
    flex-wrap: wrap;
}

.anime_item {
    margin: 10px;
    width: 250px;
}

.anime_item img {
    width: 80%;
    height: auto;
    /* allows to adapt to browser width */
    overflow: hidden;
}
/**
 * add an anime to the history and updates display
 */
function updateHistory(anime) {
    animeHistory.push(anime)
    //update display
    addAnimeToHistoryTag(anime)
}

/**
 * Update the DOM
 */
function addAnimeToHistoryTag(anime) {
    document.querySelector('#history').innerHTML = buildAnimeMarkup(anime) + document.querySelector('#history').innerHTML
}

/**
 * loadAnAnime from the internet and place it on a target element
 */
async function onOkButtonClickAsync() {
    let targetElementId = '#main_anime'
    let animeId = document.querySelector("#anime_id_input").value
    try {
        const response = await fetch(API_ANIME + animeId)
        if (!response.ok) {
            return
        }
        let anime = await response.json()
        console.log("anime", anime)
        document.querySelector(targetElementId).innerHTML = buildAnimeMarkup(anime)

        updateHistory(anime)
    } catch (err) {
        console.error(`error ${err}`)
    }
}
Generate a manifest:
Since the web manifest is a plain JSON file, we can either write it manually or use a tool to generate it. We are going to use this Web App Manifest Generator .
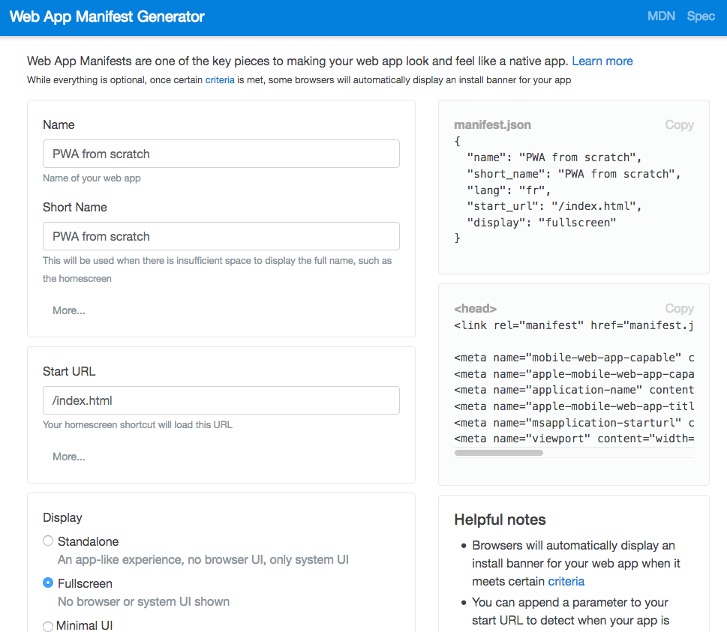
Using the tool, try to generate the following JSON file or a similar one.
{
    "name": "PWA from scratch",
    "short_name": "PWA from 0",
    "lang": "fr",
    "start_url": "/",
    "display": "fullscreen",
    "theme_color": "#c2f442",
    "icons": [{
            "src": "pwa0-64.png",
            "sizes": "64x64"
        },
        {
            "src": "pwa0-128.png",
            "sizes": "128x128"
        },
        {
            "src": "pwa0-512.png",
            "sizes": "512x512"
        }
    ]
}
Put that JSON in a file called manifest.json and place it in the root of your website along the different icons. Maybe you can find your icons in FLATICON
.
We will also update the HTML head with the html generated by the tool. Of course the most important tag is <link rel="manifest" href="manifest.json">.
<link rel="manifest" href="manifest.json">

<meta name="mobile-web-app-capable" content="yes">
<meta name="apple-mobile-web-app-capable" content="yes">
<meta name="application-name" content="PWA from scratch">
<meta name="apple-mobile-web-app-title" content="PWA from scratch">
<meta name="msapplication-starturl" content="/index.html">
<meta name="viewport" content="width=device-width, initial-scale=1, shrink-to-fit=no">
Let’s try to open the app on a mobile phone browser. Enter the url MACHINE_IP:PORT, tap the menu button of your browser and look for the option Add to home screen
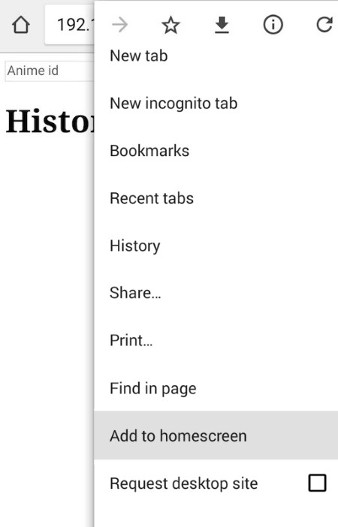
By choosing this option, you will end up with a link of you PWA on your home screen.
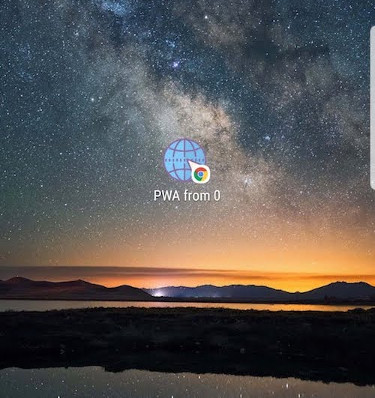
Next, tap on the shortcut. You will see a small loading screen. It can be customized using the theme_color and icons properties.
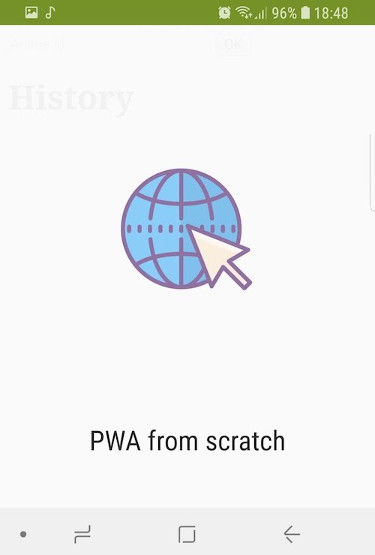
Right after that, the fullscreen PWA is shown with all its glory thanks to the "display": "fullscreen" option in the manifest.

Adding a Service Worker
In this section, we are going to cache the static files as well as the responses of the anime that the user previously fetched. Please note that we will be persisting the history in this section.
In order to cache the responses of the requests made by the browser, we need to implement a proxy that intercepts them. In other words we will customize the behavior of the fetch calls by caching the response and presenting the cached content instead of the network content. The proxy that allows us to do that is called a Service Worker. It is accompanied with an API that allows to cache network responses which are the Cache API
.
The service worker is basically a set of event handlers for some browser events that must be implemented in a separate file, often called sw.js. In order to use it, we need to first register it to the browser. Registration is done by calling navigator.serviceWorker.register.
Add the following function to the main.js file and add it to the onload event handler of your index.html page.
/**
 * Install the service worker
 */
async function installServiceWorkerAsync() {
    if ('serviceWorker' in navigator) {
        try {
            let serviceWorker = await navigator.serviceWorker.register('/sw.js')
            console.log(`Service worker registered ${serviceWorker}`)
        } catch (err) {
            console.error(`Failed to register service worker: ${err}`)
        }
    }
}
When the page reloads, you should see the following log line in the console of your browser.
Service worker registered [object ServiceWorkerRegistration]
This means that the file sw.js specified in let serviceWorker = await navigator.serviceWorker.register('/sw.js') has been successfully registered as a service worker. You can confirm that by checking the Applications tab of the Chrome developer tools.
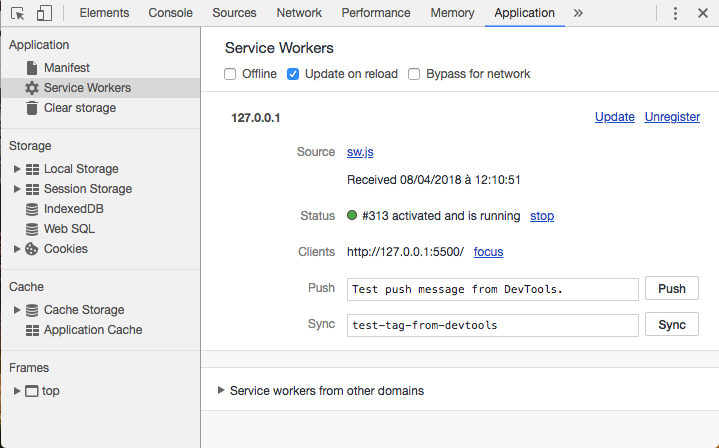
The application tab is a very useful tool for debugging your PWA. I invite you to play with its different menus.
When developing a service worker, it is recommended to check the Update on reload checkbox. It makes chrome reinstall the Service Worker after each registration. Otherwise, when you register a new service worker, we will have to manually unregister the previous one before. So, please go ahead and check it.
Next, create a JavaScript file at the root folder called sw.js (or whatever name you specified to the register method). As explained above, the service worker is a set of event handlers that allow us to mainly provide caching behavior. With respect to that, we are going to implement two event handlers: install and fetch.
The first event is install. It is called once after a successful service worker registration. It is the best place to cache the app shell and all static content. We are going to use Cache API of the service worker to add those files as follows. Add the following code to sw.js.
const CACHE_NAME = "V1"

/**
 * The install event is fired when the registration succeeds.
 * After the install step, the browser tries to activate the service worker.
 * Generally, we cache static resources that allow the website to run offline
 */
this.addEventListener('install', async function() {
    const cache = await caches.open(CACHE_NAME);
    cache.addAll([
        '/index.html',
        '/main.css',
        '/main.js',
    ])
})
Using the cache is pretty straightforward; we first open it and then addAll static files.
You can check that the files are successfully added by clicking on the Cache Storage on the left menu.
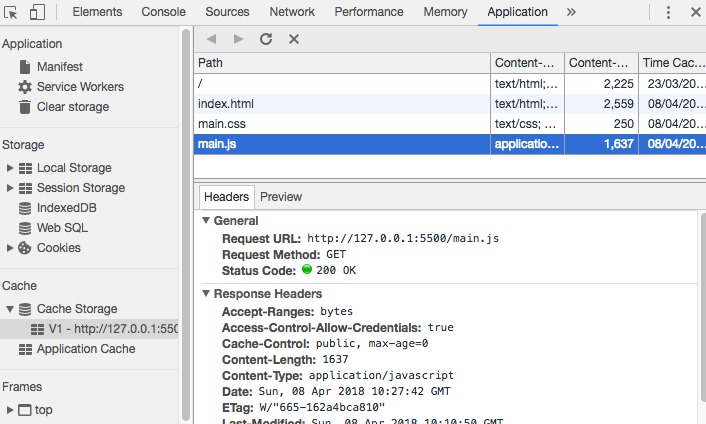
Great, the files that I added earlier are all inside the cache storage. However, we just did half of the job because the cache is not loaded. In order to confirm that, click on the offline checkbox in the service worker menu. Refresh the page and … :scream: the web app fails to load.
To sum up, we added files to the cache but they were not loaded in offline mode. The problem is that we did not tell the browser to use them when the network call fails.
The remaining piece of the puzzle is the fetch event of the service worker. And as a bonus the fetch event handler that we are going to implement will also cache the API calls. This is possible because the event is called before any network request is emitted by the browser. When we handle this event, we can choose to load cached content, forge our response object or just get the network response.
Please add to following to the service worker.
/**
 * The fetch event is fired every time the browser sends a request.
 * In this case, the service worker acts as a proxy. We can for example return the cached
 * version of the ressource matching the request, or send the request to the internet
 * , we can even make our own response from scratch !
 * Here, we are going to use cache first strategy
 */
self.addEventListener('fetch', event => {
    //We defind the promise (the async code block) that return either the cached response or the network one
    //It should return a response object
    const getCustomResponsePromise = async () => {
        console.log(`URL ${event.request.url}`, `location origin ${location}`)

        try {
            //Try to get the cached response
            const cachedResponse = await caches.match(event.request)
            if (cachedResponse) {
                //Return the cached response if present
                console.log(`Cached response ${cachedResponse}`)
                return cachedResponse
            }

            //Get the network response if no cached response is present
            const netResponse = await fetch(event.request)
            console.log(`adding net response to cache`)

            //Here, we add the network response to the cache
            let cache = await caches.open(CACHE_NAME)

            //We must provide a clone of the response here
            cache.put(event.request, netResponse.clone())

            //return the network response
            return netResponse
        } catch (err) {
            console.error(`Error ${err}`)
            throw err
        }
    }

    //In order to override the default fetch behavior, we must provide the result of our custom behavoir to the
    //event.respondWith method
    event.respondWith(getCustomResponsePromise())
})
Please note that the critical line of code is this one event.respondWith(getCustomResponsePromise()). It allows us to override the browser response with a Promise or async function that resolves to a Response instance. Without that call, the service worker would be nearly useless.
Basically, this event handler loads content from the Cache Storage. If the content is not available, we get it from the internet. This behavior is called a Cache first strategy. Other strategies are available and you can even make your own fetch cats :smiley_cat: strategy.
Reload the page, do some anime searches and verify the cache storage. New elements should pop up there.
Caching the history
This section will show a method to persist the animeHhistory array using the localStorage object. This object provides functions to store data and retrieve when the page is reloaded even after closing the browsing windows. Storing an entry is performed using localStorage.setItem(key, entry) and retrieving it is performed using localStorage.getItem(key).
The caveat here is that this persistent storage works only with string values. So, we need to serialize/deserialize our array to/from a JSON string when storing/loading respectively. This is achieved thanks to JSON.stringify(array) and JSON.parse(string) functions.
In main.js, modify the updateHistory function as follows.
const HISTORY_STORAGE_KEY = 'HISTORY_KEY'
/**
 * add an anime to the history and updates display
 */
function updateHistory(anime) {
    animeHistory.push(anime)
    //Save the array in the local storage
    localStorage.setItem(HISTORY_STORAGE_KEY, JSON.stringify(animeHistory))
    //update display
    addAnimeToHistoryTag(anime)
}
On to the final touch. Make the onLoadAsync function load the persisted history when the DOM is ready.
/**
 * The history is serrialized as a JSON array. We use JSON.parse to convert is to a JavaScript array
 */
function getLocalHistory() {
    return JSON.parse(localStorage.getItem(HISTORY_STORAGE_KEY))
}

async function onLoadAsync() {
    //load the history from cache
    let history = getLocalHistory()
    if (history !== null) {
        //set the animeHistory array and update the display
        animeHistory = history
        animeHistory.forEach(anime => addAnimeToHistoryTag(anime))
    }

    //Install the service worker
    if ('serviceWorker' in navigator) {
        try {
            let serviceWorker = await navigator.serviceWorker.register('/sw.js')
            console.log(`Service worker registered ${serviceWorker}`)
        } catch (err) {
            console.error(`Failed to register service worker: ${err}`)
        }
    }
}
Don’t panic, we just added a function that loads the anime history from the local storage and called it in the onLoadAsync event handler. It is recommended to do it there since we want to update the DOM with the history as soon as the former is ready.

Voilà, our small PWA shows the history when the page is loaded and is updated over time :fireworks:.
Conclusion and going further
This article is a general introduction to PWA. It started by giving an introduction and an explanation of many concepts related to PWA, notably: the app shell, the manifest, the service worker and caching. After that we delved into some with a guide that showed how to build a basic PWA from scratch. We also learned how to use Chrome dev tools to debug service workers. We just scratched the surface of these features and many more things can be done. Some improvements are:
- Add HTTPS which is mandatory for a PWA
- Implement a different caching strategy.
- Add server side rendering.
If you want to build a production PWA, We suggest to use frameworks that support PWA or plugins for PWA if you use a CMS. Generally you don’t need to implement some/all the code of the service worker but it is interesting to know how it works.
Happy coding :)


